
Configure Git settings
By using the Git integration through Mage, Mage will automatically set your local repo as a safe directory (i.e.
git config --global --add safe.directory <local repo path>)SSH
SSH
SSH keys with passphrase are not supportedThe Git integration currently does not support repositories that require an SSH key with a passphrase.You can, however, use the Mage terminal and the git CLI to perform your git actions.
You’ll still need to generate your SSH keys as normal. You can start a ssh-agent in the terminal so that
you don’t have to enter your SSH key passphrase every time you perform an action.
eval $(ssh-agent -s) && ssh-add ~/.ssh/id_rsaCheck .gitignore settings
Ensure that
.preferences.yaml is added to your repo’s .gitignore file so that your Git settings aren’t pushed to Github.Navigate to Git settings
Navigate to the Wizard icon in the top right, then select Settings to open your Mage settings. There should be an option for Git settings on the left side of the settings modal.
Select SSH as the authentication type.
Change the authentication type to SSH. The interface will change for you to input a remote repo url.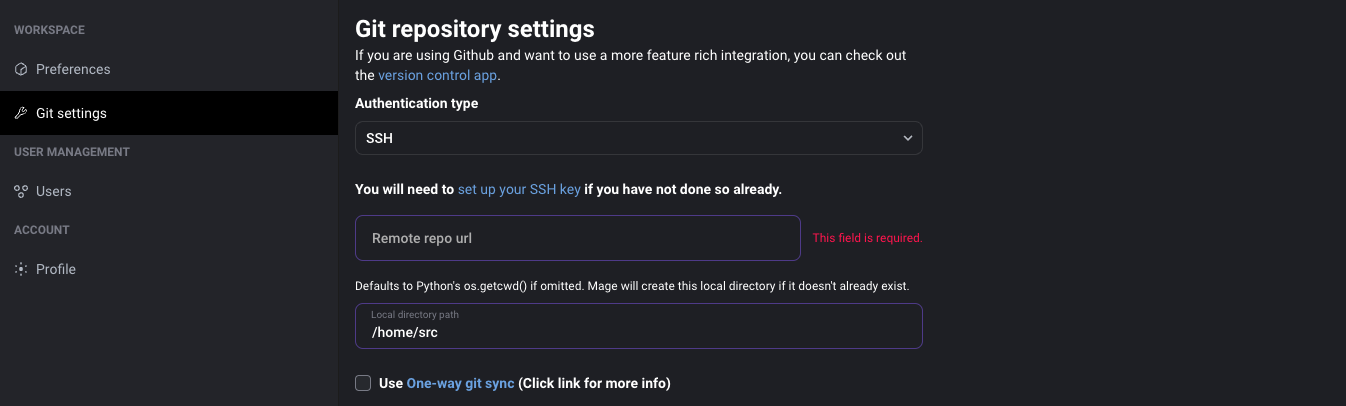
Set up your SSH key
If you haven’t already, configure your SSH key— this will allow your instance to access GitHub. Our instructions can help if you’re unfamiliar with the process.
Add Git details
Remote repo url: Your Github repository’s remote url. Use the SSH link instead of HTTPS link.Local directory path: The directory in your machine that will be synced with the Github repository. If this field is omitted, it will default to the path determined by Python’sos.getcwd(). You can check what your current working directory is in a Scratchpad block.
[Optional] Enable One-way Git Sync
If using Git Sync, tic the box labeled "use One-way Git Sync". You can read more about Git Sync here. If One-way Git Sync is enabled, you'll also need to provide:
Branch Name: The name of the branch you want to sync with.Include submodules: If your repo has submodules, tic this box to include them in the sync.Sync before each trigger run: If you'd like a sync to occur before a trigger run to ensure that the latest code is used, tic this box.Sync on server start up: If you'd like to sync on server start up, tic this box.
Fill out the remaining fields.
Filling out these fields will allow Mage to recreate your git and SSH settings if they are deleted (i.e. if your container restarts):
If you are using a AWS CodeCommit repository, you will need to set the username to the SSH Key ID of the SSH public key added to your AWS IAM user.
Username: Your git username. If you push to your remote repo, this username will show up next to your commits.Email: Your git email. Used for the same purpose as your username.SSH public key in base64,SSH public key in base64: Enter your SSH public and private key encoded in base64. You can follow the instructions in the field description if you want to Mage to save your SSH keys.
HTTPS/Token
HTTPS/Token
Check .gitignore settings
Ensure that
.preferences.yaml is added to your repo’s .gitignore file so that your Git settings aren’t pushed to Github.Navigate to Git settings
Navigate to the Wizard icon in the top right, then select Settings to open your Mage settings.There should be an option for Git settings on the left side of the settings modal.
Add Git details
Remote repo url: Your Github repository’s remote url. Use the SSH link instead of HTTPS link.Local directory path: The directory in your machine that will be synced with the Github repository. If this field is omitted, it will default to the path determined by Python’sos.getcwd(). You can check what your current working directory is in a Scratchpad block.
[Optional] Enable One-way Git Sync
If using Git Sync, tic the box labeled "use One-way Git Sync". You can read more about Git Sync here. If One-way Git Sync is enabled, you'll also need to provide:
Branch Name: The name of the branch you want to sync with.Include submodules: If your repo has submodules, tic this box to include them in the sync.Sync before each trigger run: If you'd like a sync to occur before a trigger run to ensure that the latest code is used, tic this box.Sync on server start up: If you'd like to sync on server start up, tic this box.
Fill out the remaining fields.
Username: Your git username. If you push to your remote repo, this username will show up next to your commits.Email: Your git email. Used for the same purpose as your username.Access token: Enter the Git access token that you created in step 4.
Generate SSH Token
If you’re using a method that requires an SSH token in Mage, this section will walk you through generating one. If you’re using a method that requires an HTTPS token, you can skip this section.SSH
SSH
Check for existing SSH key
Follow GitHub’s guide here to check for an existing SSH key.
Generate a new SSH key
If no key exists, generate a new key using this guide.You may skip this step if you already have a key.
Add SSH key to your Git provider
This step allows your Git provider to recognize your SSH key and communicate.
Test your SSH connection