> ## Documentation Index
> Fetch the complete documentation index at: https://docs.mage.ai/llms.txt
> Use this file to discover all available pages before exploring further.
# Develop Mage Pro Code with VS Code or Cursor
> Learn how to develop Mage Pro pipelines and projects using Visual Studio Code or Cursor. This guide walks you through secure remote access via Tailscale and SSH, environment configuration, and integrating your local IDE with Mage Pro.
export const ProOnly = ({button = 'Get started for free', description = 'Try our fully managed solution to access this advanced feature.', source = 'documentation', title = 'Only in Mage Pro.'}) =>
;
## Overview
Mage Pro supports remote development using [Visual Studio Code](https://code.visualstudio.com/) or [Cursor](https://www.cursor.so/), so you can build and manage your pipelines in a full-featured local IDE while connecting securely to your Mage Pro environment. This integration leverages [Tailscale VPN](https://tailscale.com/) for secure networking and SSH for remote access.
> ⚠️ This feature is not available by default on Trial clusters.
> To enable access, please contact the Mage team at **[pro@mage.ai](mailto:pro@mage.ai)** to request activation for your Mage Pro account.
## Core components
* **Tailscale VPN**: Secure network connection between local and remote environments
* **Remote SSH Extension**: VS Code's tool for remote development
* **Mage Pro Cluster**: Containerized environment for data pipelines
* **Authentication System**: Secure key-based access control
To integrate with VS Code or Cursor please contact Mage to request an account upgrade. The Mage team will need to enable this feature for your organization.
## Setup guide
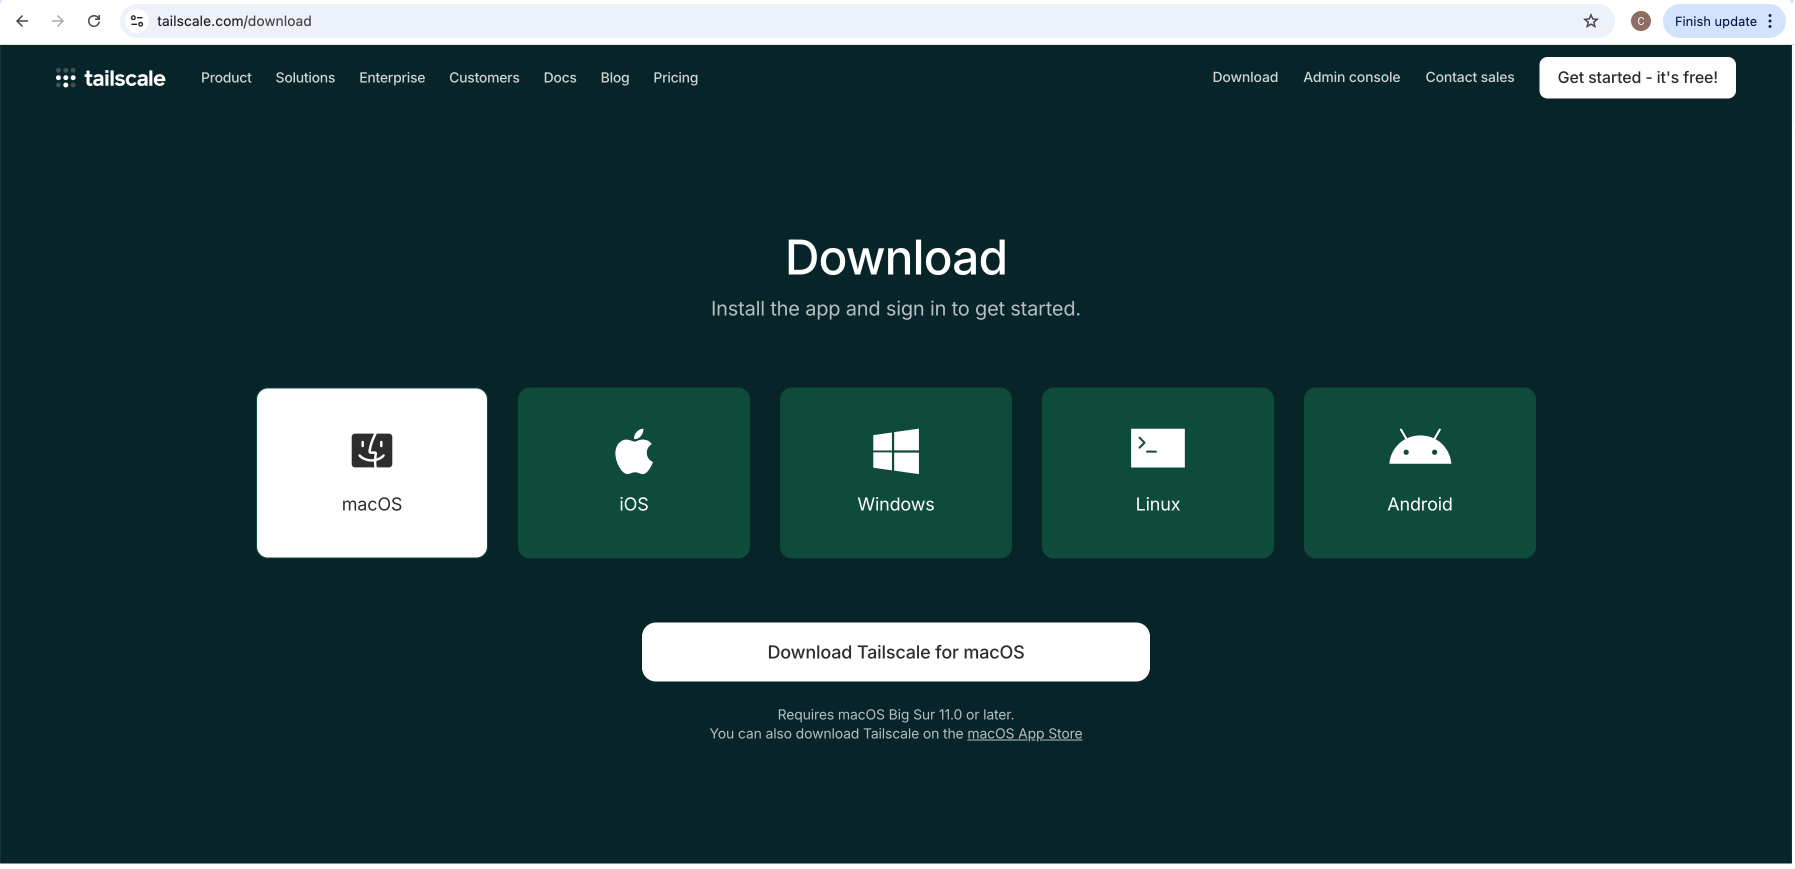
### 1. Tailscale VPN setup
Step 1: Navigate to the Tailscale website and download the appropriate version for your operating system.
Step 2: Install Tailscale following the in-app instructions.
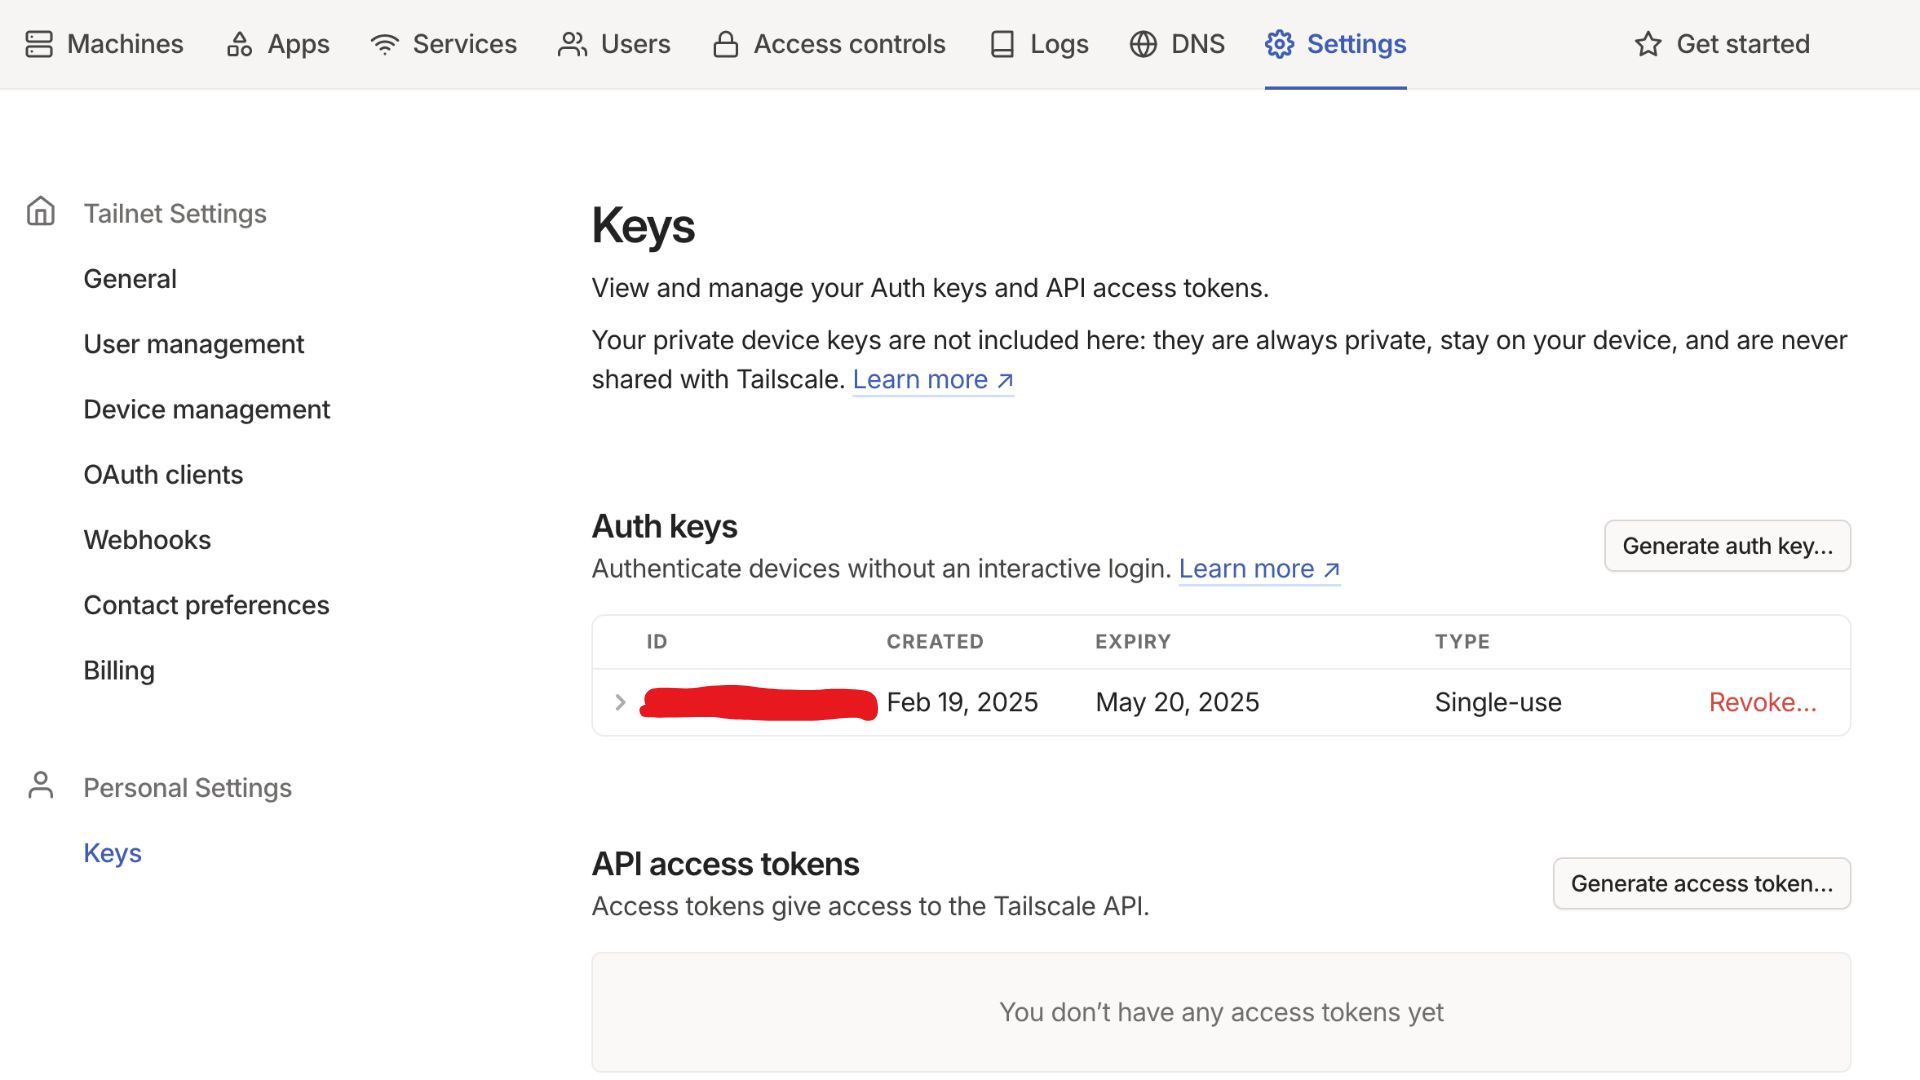
Step 3: Access the Tailscale admin console from their main website.
Step 4: Generate an Auth Key by navigating to Settings > Keys and selecting "Generate Auth Key."
### 2. Mage Pro configuration
#### Setting Environment Variables for the Cluster
Step 1: Navigate to your Mage Pro management cluster.
Step 2: Select "Edit/Add variable’ to add environment variables.
Step 3: Add a new custom variable:
* Key: `TS_AUTHKEY`
* Key: `TS_AUTH_KEY`
* Value: `YOUR_AUTH_KEY`
Step 4: Click the “Save changes” button to save the TS\_AUTHKEY variable.
(This will restart your cluster).
#### Setting Environment Variables for Workspaces
If you are using Mage Pro **workspaces**, you must configure environment variables separately at the workspace level.
> **Note**: Each workspace requires its own **unique** `TS_AUTHKEY`.
> Generate a separate Tailscale auth key for each workspace to ensure proper network isolation and security.
To configure environment variables for a workspace, follow the guide here:
👉 [Workspace Environment Configuration](/guides/developer-ux/workspaces#environment-configuration)
Here’s an example workspace configuration:
```yaml theme={"system"}
env:
- name: TS_AUTHKEY
value:
- name: TS_EXTRA_ARGS
value: --accept-routes
- name: ENV
value: dev
- name: USER_CODE_PATH
value: /home/src/
```
### 3. Connection verification
Step 1: Return to the Tailscale admin panel after your cluster restarts.
Step 2: Locate your Mage Pro cluster in your Machine’s list (i.e. mageai-1-tutorials).
Step 3: Note the private IP address from the address column.
Step 4: Open a terminal on your local machine and run the following command:
```bash theme={"system"}
curl :6789/api/status
```
Step 5: Verify that you receive a successful connection response.
### 4. VS Code setup
Step 1: Open Visual Studio Code on your local machine.
Step 2: Install the "Remote - SSH" extension from the Extensions marketplace (Ctrl+Shift+X or Cmd+Shift+X on macOS).
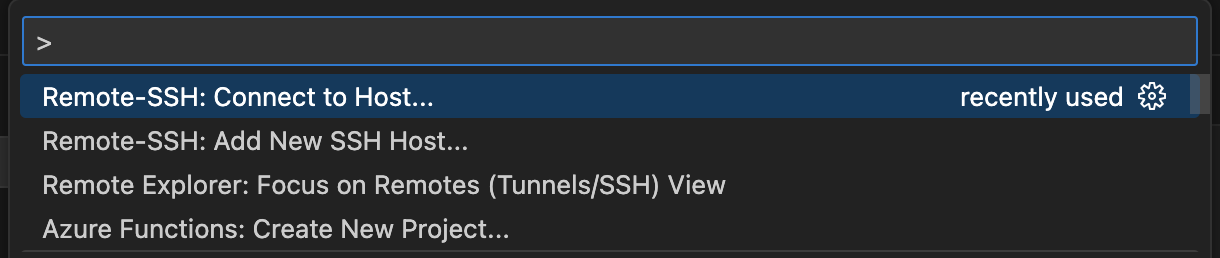
Step 3: Open the Command Palette (Ctrl+Shift+P or Cmd+Shift+P on macOS).
Step 4: Type "Remote-SSH: Connect to Host" and select it.
Step 5: Enter or select the correct ip address.
Step 6: Enter the login username and password which will first be provided to you by Mage
### 5. Accessing your code
Step 1: When prompted for the folder to open, enter your user code path.
* Default user code path: `/home/src/default_repo`
Step 3: If you've customized this path, use your specific directory.
Step 4: Click "OK" to open your project files in VS Code.
# Setting up Tailscale on AWS
Connect your AWS instances to your secure network using Tailscale to enable access to your cloud resources. When using Mage Pro in AWS environments, proper route configuration ensures reliable connectivity between your local machine and cloud resources.
## Setting up route acceptance in Tailscale
Route acceptance in Tailscale can be configured in two ways to ensure proper connectivity between your local machine and AWS-hosted Mage Pro environment.
### 1. Using the command line
Run the following command on your local machine to accept routes advertised by Tailscale nodes:
```bash theme={"system"}
tailscale up --accept-routes
```
### 2. Using the admin console
Step 1: Navigate to the Tailscale admin console ([https://login.tailscale.com/admin](https://login.tailscale.com/admin))
Step 2: Go to the "Machines" page
Step 3: Find the machine that's advertising routes (in your case, the "vpn" node)
Step 4: Click on it to view details
Step 5: Under "Subnet routes" section, approve which subnet routes should be advertised to the entire tailnet
### Understanding route configuration
The two configuration methods work together:
* Admin UI settings control which machines can advertise routes (a tailnet-wide setting)
* Command-line option (`-accept-routes`) determines whether your specific machine will accept those advertised routes
### Configuring Mage Pro for route acceptance
To ensure your Mage Pro environment automatically accepts routes when it starts, add the following environment variable:
* Key: `TS_EXTRA_ARGS`
* Value: `-accept-routes`
### Verifying route acceptance
After configuring route acceptance, verify it's working correctly:
```bash theme={"system"}
tailscale status
```
You should no longer see health warnings about routes not being accepted, and you should be able to access the subnet IPs that were being advertised.
 Step 2: Install Tailscale following the in-app instructions.
Step 3: Access the Tailscale admin console from their main website.
Step 4: Generate an Auth Key by navigating to Settings > Keys and selecting "Generate Auth Key."
Step 2: Install Tailscale following the in-app instructions.
Step 3: Access the Tailscale admin console from their main website.
Step 4: Generate an Auth Key by navigating to Settings > Keys and selecting "Generate Auth Key."
 ### 2. Mage Pro configuration
#### Setting Environment Variables for the Cluster
Step 1: Navigate to your Mage Pro management cluster.
Step 2: Select "Edit/Add variable’ to add environment variables.
Step 3: Add a new custom variable:
* Key: `TS_AUTHKEY`
* Key: `TS_AUTH_KEY`
* Value: `YOUR_AUTH_KEY`
Step 4: Click the “Save changes” button to save the TS\_AUTHKEY variable.
(This will restart your cluster).
### 2. Mage Pro configuration
#### Setting Environment Variables for the Cluster
Step 1: Navigate to your Mage Pro management cluster.
Step 2: Select "Edit/Add variable’ to add environment variables.
Step 3: Add a new custom variable:
* Key: `TS_AUTHKEY`
* Key: `TS_AUTH_KEY`
* Value: `YOUR_AUTH_KEY`
Step 4: Click the “Save changes” button to save the TS\_AUTHKEY variable.
(This will restart your cluster).
 #### Setting Environment Variables for Workspaces
If you are using Mage Pro **workspaces**, you must configure environment variables separately at the workspace level.
> **Note**: Each workspace requires its own **unique** `TS_AUTHKEY`.
> Generate a separate Tailscale auth key for each workspace to ensure proper network isolation and security.
To configure environment variables for a workspace, follow the guide here:
👉 [Workspace Environment Configuration](/guides/developer-ux/workspaces#environment-configuration)
Here’s an example workspace configuration:
```yaml theme={"system"}
env:
- name: TS_AUTHKEY
value:
#### Setting Environment Variables for Workspaces
If you are using Mage Pro **workspaces**, you must configure environment variables separately at the workspace level.
> **Note**: Each workspace requires its own **unique** `TS_AUTHKEY`.
> Generate a separate Tailscale auth key for each workspace to ensure proper network isolation and security.
To configure environment variables for a workspace, follow the guide here:
👉 [Workspace Environment Configuration](/guides/developer-ux/workspaces#environment-configuration)
Here’s an example workspace configuration:
```yaml theme={"system"}
env:
- name: TS_AUTHKEY
value: 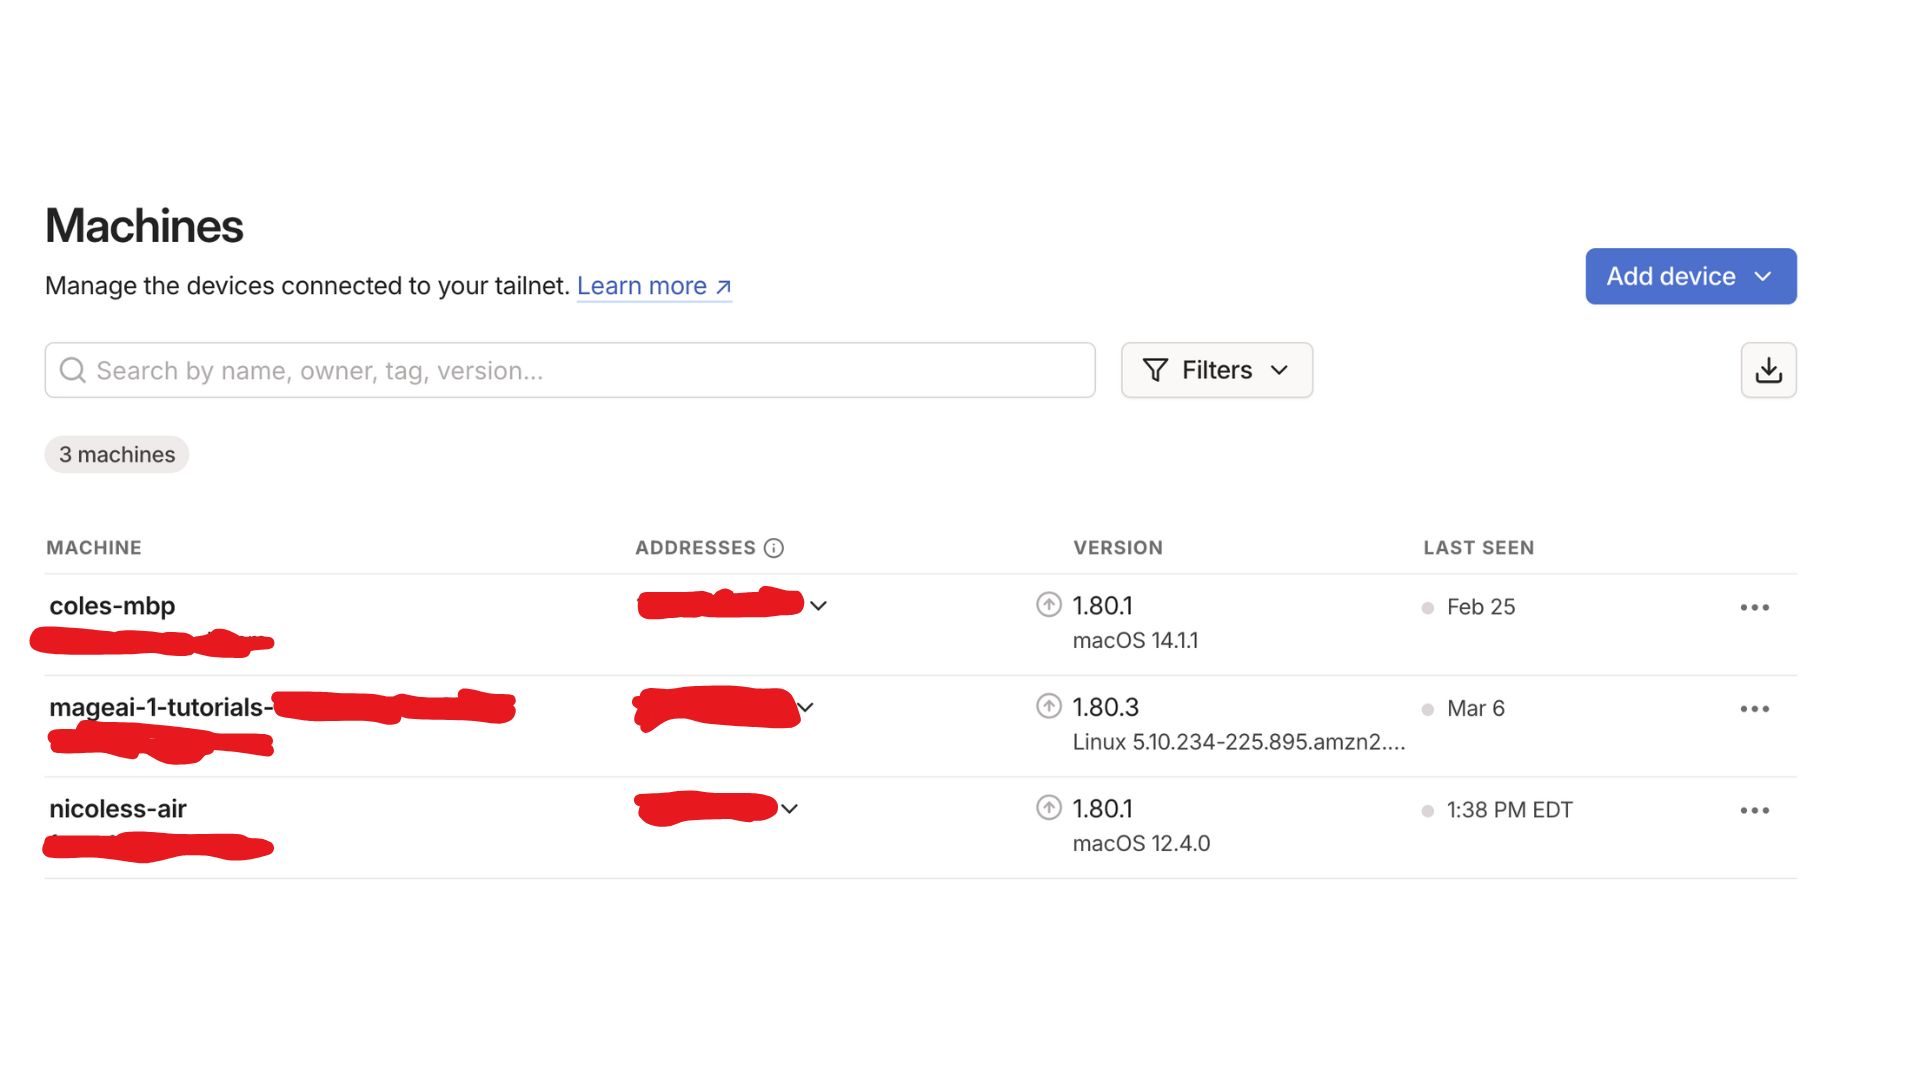 Step 4: Open a terminal on your local machine and run the following command:
```bash theme={"system"}
curl
Step 4: Open a terminal on your local machine and run the following command:
```bash theme={"system"}
curl 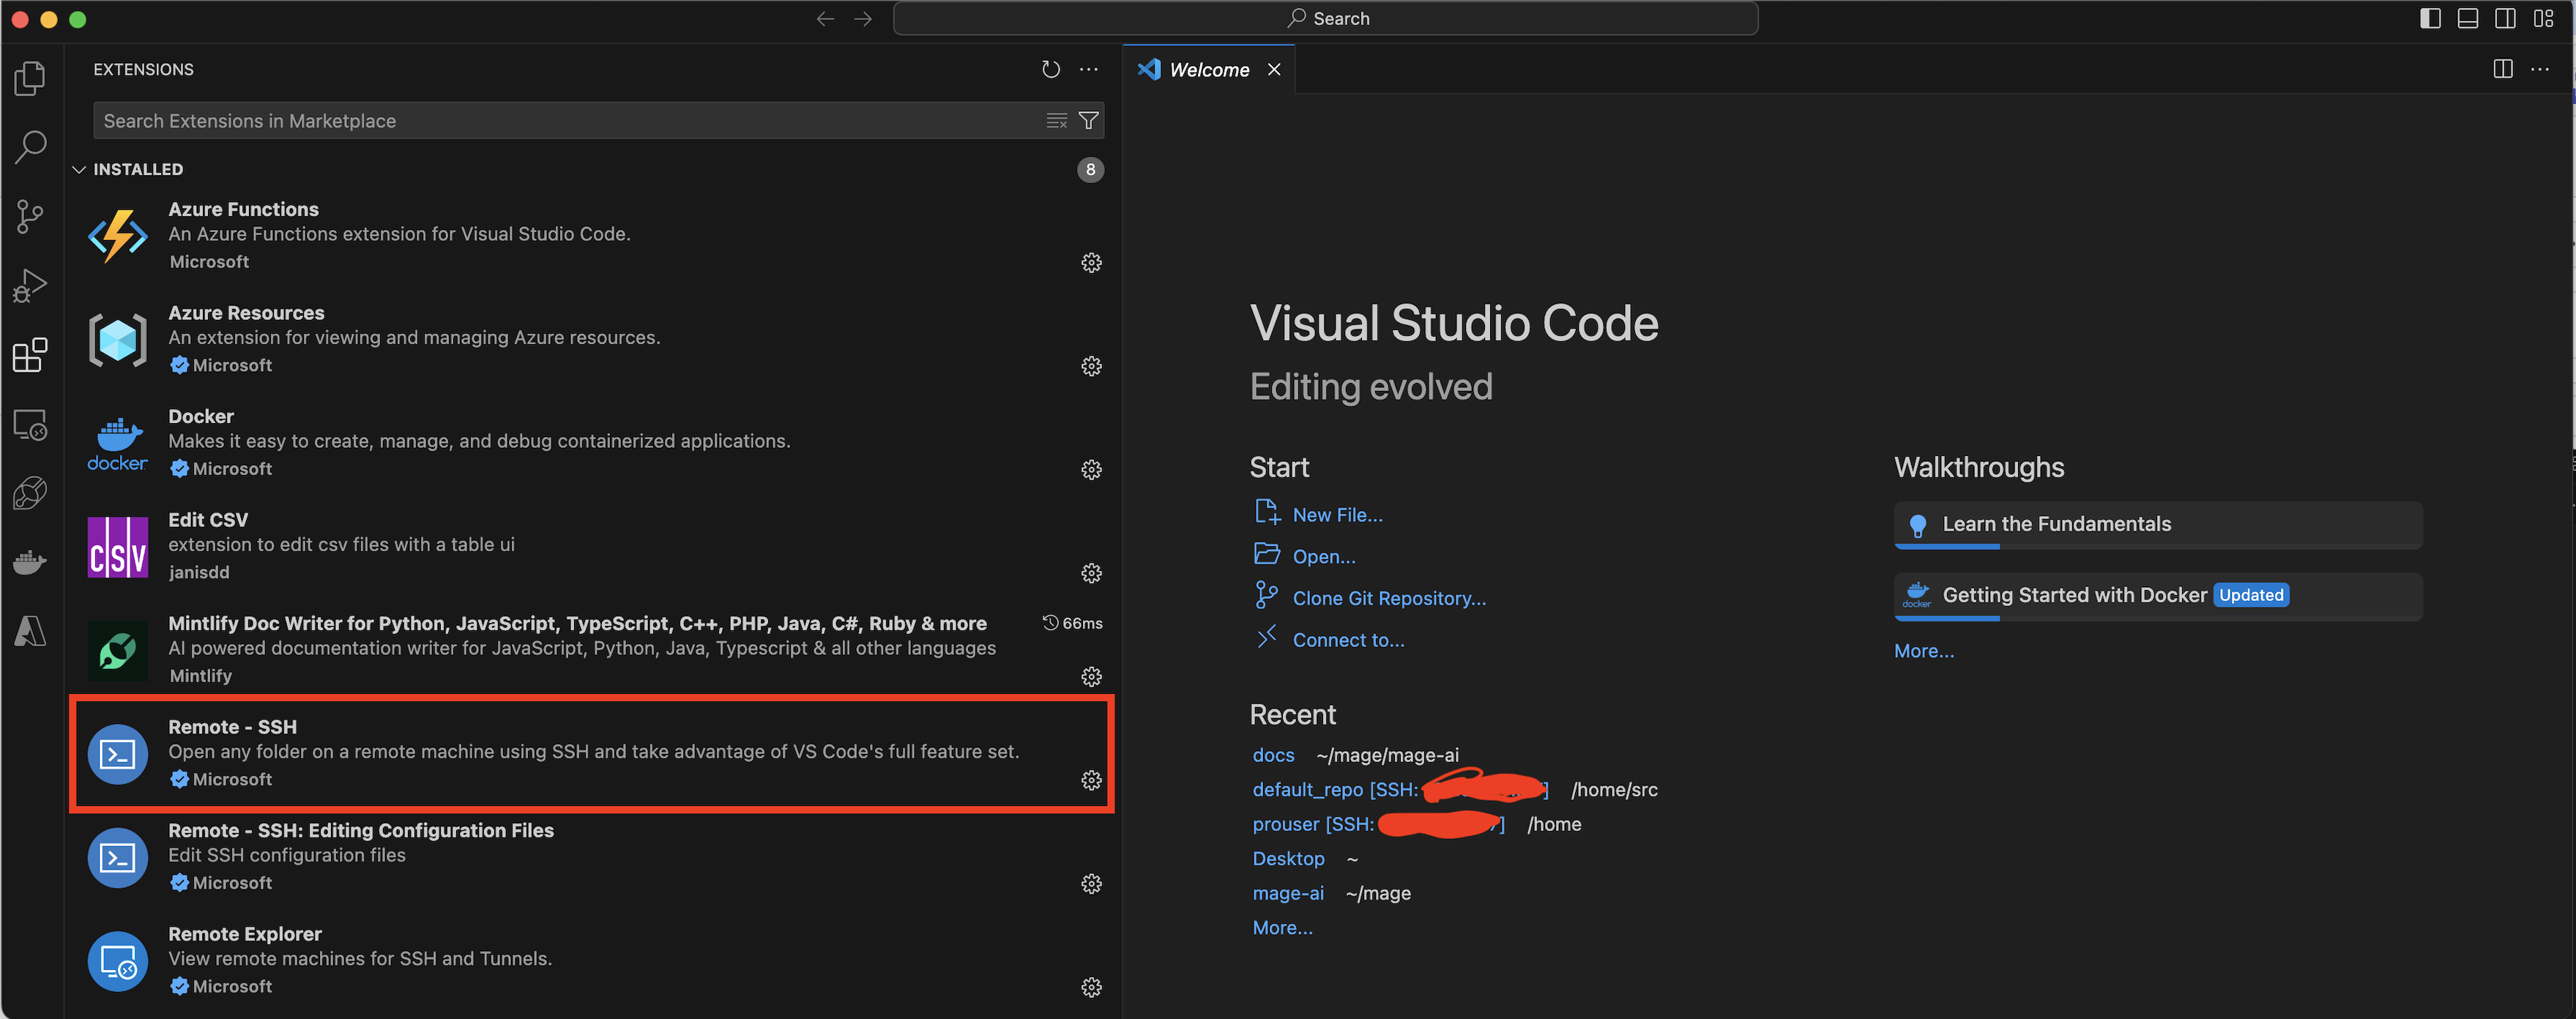 Step 3: Open the Command Palette (Ctrl+Shift+P or Cmd+Shift+P on macOS).
Step 4: Type "Remote-SSH: Connect to Host" and select it.
Step 3: Open the Command Palette (Ctrl+Shift+P or Cmd+Shift+P on macOS).
Step 4: Type "Remote-SSH: Connect to Host" and select it.
 Step 5: Enter or select the correct ip address.
 Step 6: Enter the login username and password which will first be provided to you by Mage
### 5. Accessing your code
Step 1: When prompted for the folder to open, enter your user code path.
* Default user code path: `/home/src/default_repo`
Step 3: If you've customized this path, use your specific directory.
Step 4: Click "OK" to open your project files in VS Code.
# Setting up Tailscale on AWS
Connect your AWS instances to your secure network using Tailscale to enable access to your cloud resources. When using Mage Pro in AWS environments, proper route configuration ensures reliable connectivity between your local machine and cloud resources.
## Setting up route acceptance in Tailscale
Route acceptance in Tailscale can be configured in two ways to ensure proper connectivity between your local machine and AWS-hosted Mage Pro environment.
### 1. Using the command line
Run the following command on your local machine to accept routes advertised by Tailscale nodes:
```bash theme={"system"}
tailscale up --accept-routes
```
### 2. Using the admin console
Step 1: Navigate to the Tailscale admin console ([https://login.tailscale.com/admin](https://login.tailscale.com/admin))
Step 2: Go to the "Machines" page
Step 3: Find the machine that's advertising routes (in your case, the "vpn" node)
Step 4: Click on it to view details
Step 5: Under "Subnet routes" section, approve which subnet routes should be advertised to the entire tailnet
### Understanding route configuration
The two configuration methods work together:
* Admin UI settings control which machines can advertise routes (a tailnet-wide setting)
* Command-line option (`-accept-routes`) determines whether your specific machine will accept those advertised routes
### Configuring Mage Pro for route acceptance
To ensure your Mage Pro environment automatically accepts routes when it starts, add the following environment variable:
* Key: `TS_EXTRA_ARGS`
* Value: `-accept-routes`
### Verifying route acceptance
After configuring route acceptance, verify it's working correctly:
```bash theme={"system"}
tailscale status
```
You should no longer see health warnings about routes not being accepted, and you should be able to access the subnet IPs that were being advertised.
Step 6: Enter the login username and password which will first be provided to you by Mage
### 5. Accessing your code
Step 1: When prompted for the folder to open, enter your user code path.
* Default user code path: `/home/src/default_repo`
Step 3: If you've customized this path, use your specific directory.
Step 4: Click "OK" to open your project files in VS Code.
# Setting up Tailscale on AWS
Connect your AWS instances to your secure network using Tailscale to enable access to your cloud resources. When using Mage Pro in AWS environments, proper route configuration ensures reliable connectivity between your local machine and cloud resources.
## Setting up route acceptance in Tailscale
Route acceptance in Tailscale can be configured in two ways to ensure proper connectivity between your local machine and AWS-hosted Mage Pro environment.
### 1. Using the command line
Run the following command on your local machine to accept routes advertised by Tailscale nodes:
```bash theme={"system"}
tailscale up --accept-routes
```
### 2. Using the admin console
Step 1: Navigate to the Tailscale admin console ([https://login.tailscale.com/admin](https://login.tailscale.com/admin))
Step 2: Go to the "Machines" page
Step 3: Find the machine that's advertising routes (in your case, the "vpn" node)
Step 4: Click on it to view details
Step 5: Under "Subnet routes" section, approve which subnet routes should be advertised to the entire tailnet
### Understanding route configuration
The two configuration methods work together:
* Admin UI settings control which machines can advertise routes (a tailnet-wide setting)
* Command-line option (`-accept-routes`) determines whether your specific machine will accept those advertised routes
### Configuring Mage Pro for route acceptance
To ensure your Mage Pro environment automatically accepts routes when it starts, add the following environment variable:
* Key: `TS_EXTRA_ARGS`
* Value: `-accept-routes`
### Verifying route acceptance
After configuring route acceptance, verify it's working correctly:
```bash theme={"system"}
tailscale status
```
You should no longer see health warnings about routes not being accepted, and you should be able to access the subnet IPs that were being advertised.