 ### Troubleshooting Git commands
When running Git commands, you may run into a few common issues:
* Make sure you are in the correct folder: `/home/src/
### Troubleshooting Git commands
When running Git commands, you may run into a few common issues:
* Make sure you are in the correct folder: `/home/src/{description}
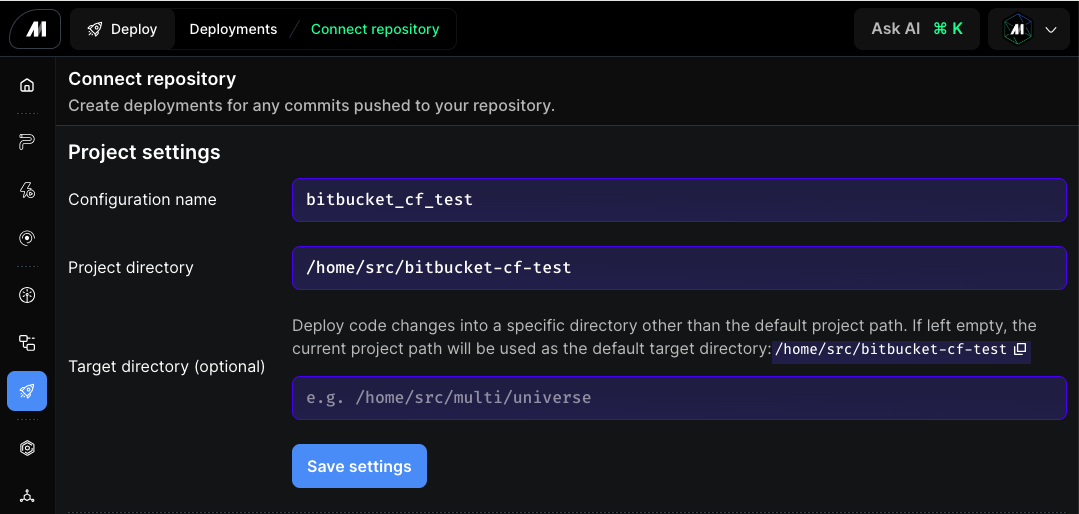
 ### Project settings
Fill in the **Project settings** fields at the top of the Connect repository page, then click **Save settings** before configuring authentication below.
* **Configuration name** — a label for this deployment configuration.
* **Project directory** — the user code path for your project. The default in Mage Pro is `/home/src/default_repo`. If you changed the `USER_CODE_PATH` environment variable in the Mage Cloud Management Portal, set this field to match.
* **Target directory (optional)** — the directory code changes are deployed into. If left empty, the project directory is used. For a nested repository you may want to set this to `/home/src`.
### Project settings
Fill in the **Project settings** fields at the top of the Connect repository page, then click **Save settings** before configuring authentication below.
* **Configuration name** — a label for this deployment configuration.
* **Project directory** — the user code path for your project. The default in Mage Pro is `/home/src/default_repo`. If you changed the `USER_CODE_PATH` environment variable in the Mage Cloud Management Portal, set this field to match.
* **Target directory (optional)** — the directory code changes are deployed into. If left empty, the project directory is used. For a nested repository you may want to set this to `/home/src`.
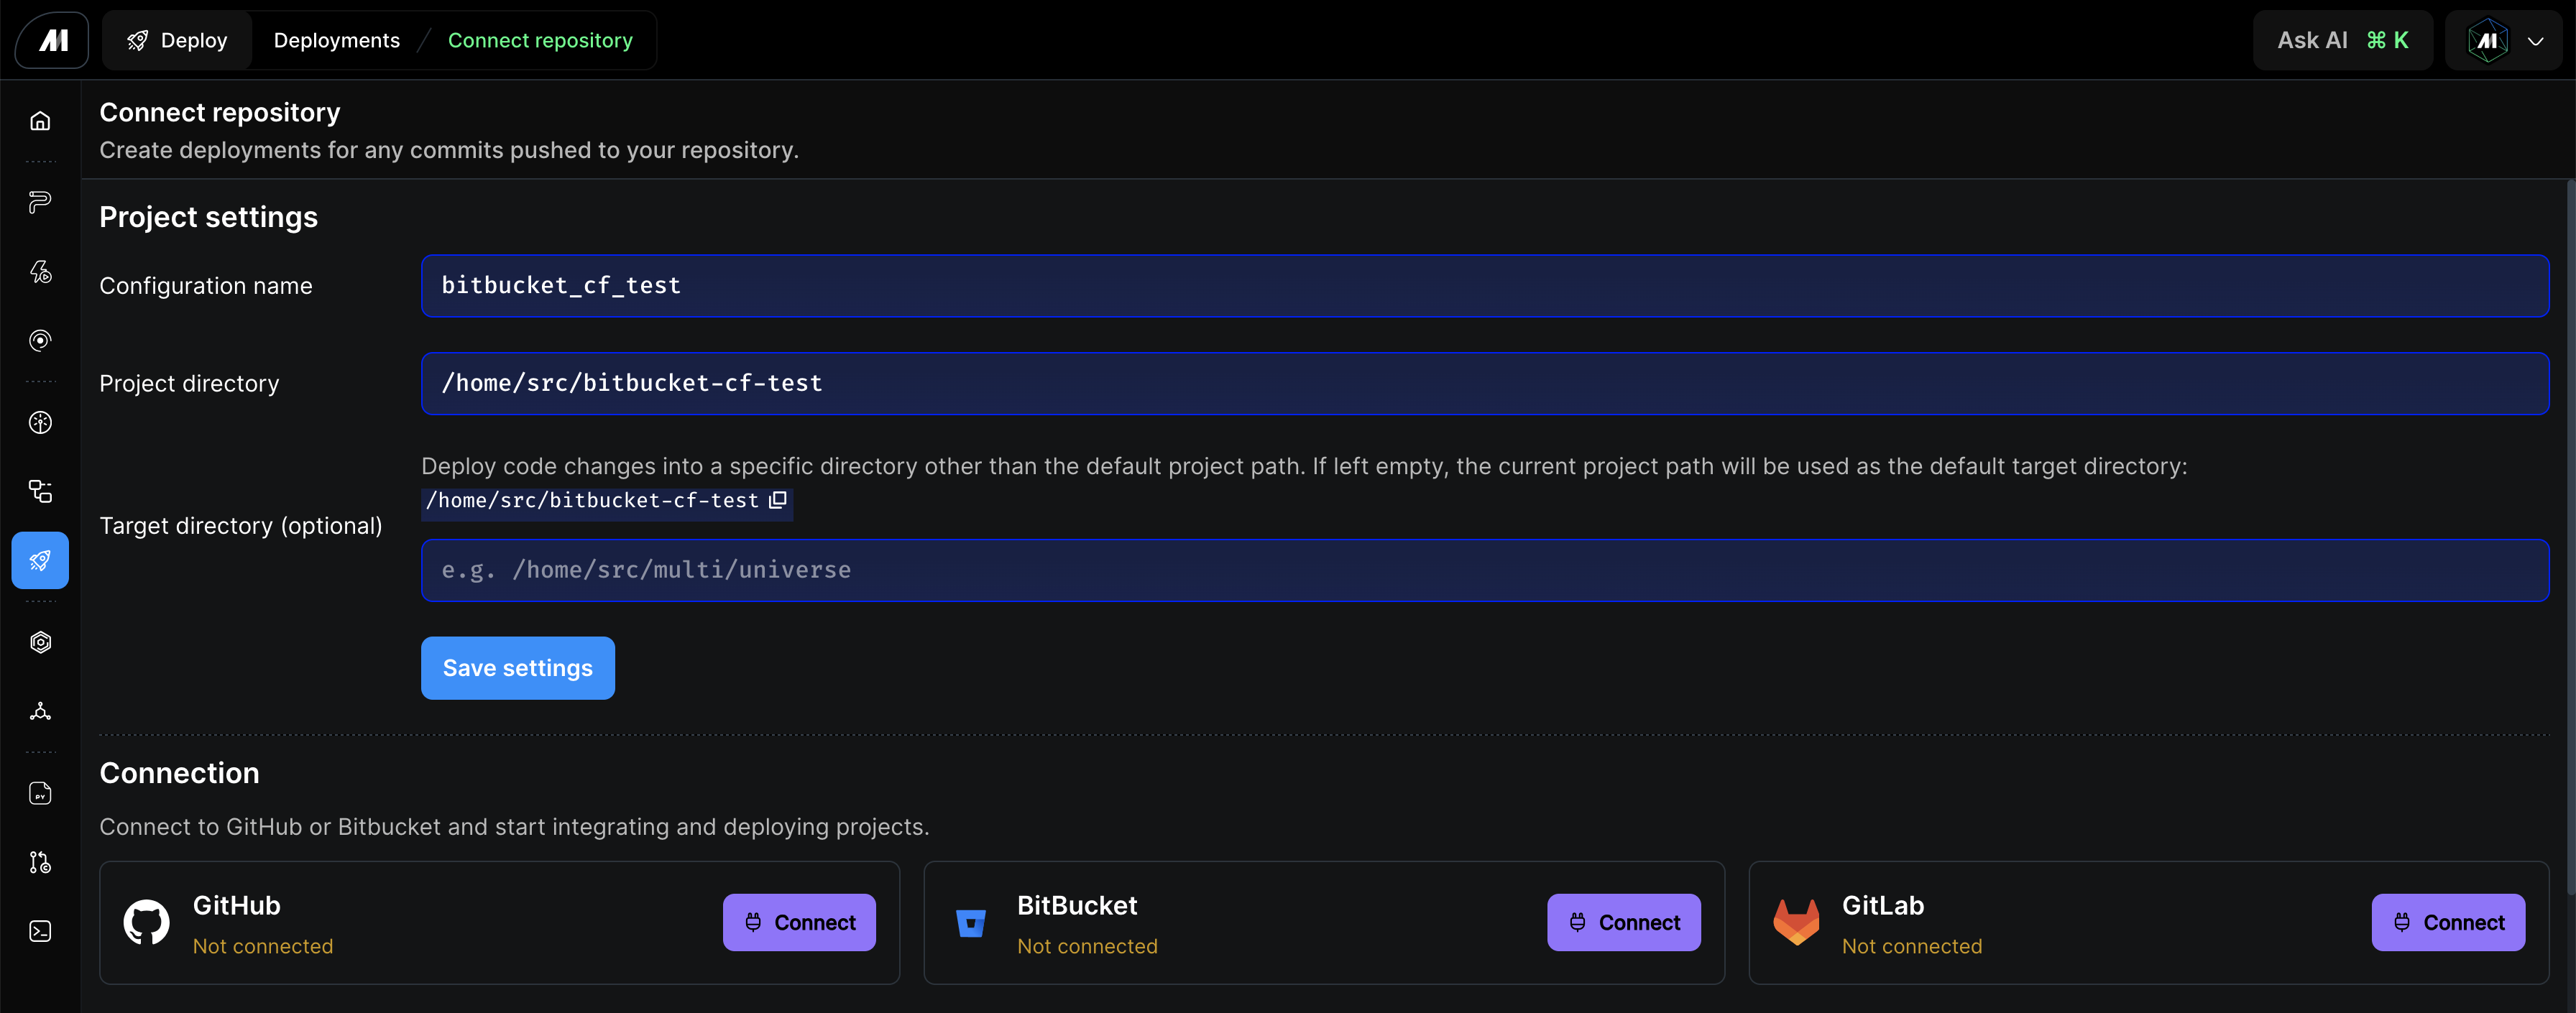 After clicking **Save settings**, proceed to the **Connection** section below to set your authentication type and connect your provider.
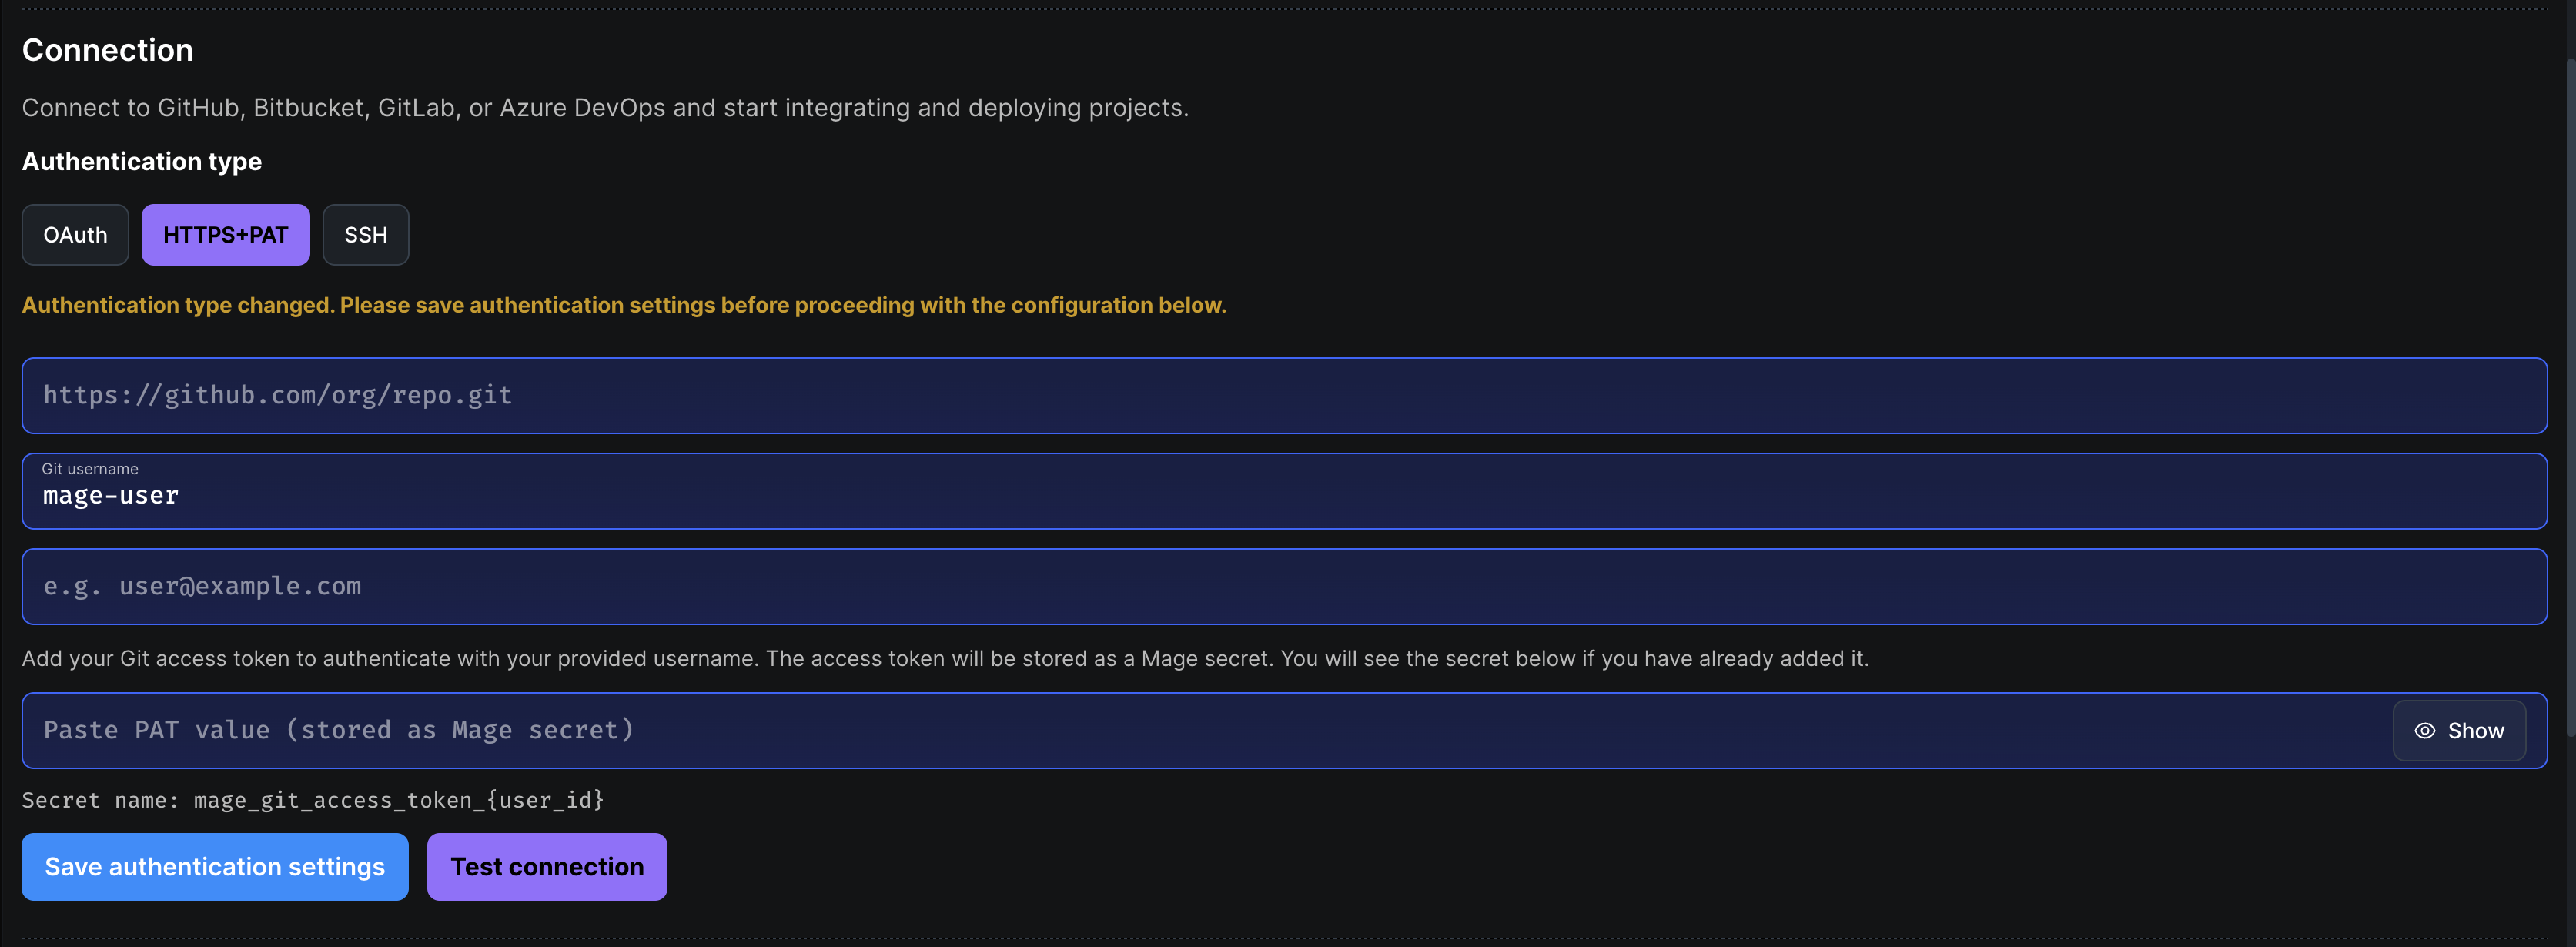
### HTTPS and personal access token (PAT)
1. Under **Connection**, set **Authentication type** to **HTTPS+PAT**.
2. Enter the **remote repository URL** in HTTPS form (for example `https://github.com/your-org/your-repo.git`). The UI derives owner and repository name from this URL.
3. Enter a **username** and **email** for Git commit authorship. These are also used as HTTP credentials: the username is your Git host account name and the PAT is sent in place of a password.
4. In your Git host, create a **personal access token** (or app password) scoped to at least **clone, fetch, and push**. Scope names differ by provider — for example, GitHub requires the `repo` scope; GitLab requires `read_repository` and `write_repository`; Bitbucket uses the `repository:write` permission.
5. Paste the token into **Personal access token** and click **Save authentication settings**. The token is stored as a **Mage secret** named `mage_git_access_token_{user_id}` (where `{user_id}` is your Mage user ID).
HTTPS+PAT uses your stored credentials for Git in the [version control terminal](#3-version-control-terminal) the same way OAuth does.
After clicking **Save settings**, proceed to the **Connection** section below to set your authentication type and connect your provider.
### HTTPS and personal access token (PAT)
1. Under **Connection**, set **Authentication type** to **HTTPS+PAT**.
2. Enter the **remote repository URL** in HTTPS form (for example `https://github.com/your-org/your-repo.git`). The UI derives owner and repository name from this URL.
3. Enter a **username** and **email** for Git commit authorship. These are also used as HTTP credentials: the username is your Git host account name and the PAT is sent in place of a password.
4. In your Git host, create a **personal access token** (or app password) scoped to at least **clone, fetch, and push**. Scope names differ by provider — for example, GitHub requires the `repo` scope; GitLab requires `read_repository` and `write_repository`; Bitbucket uses the `repository:write` permission.
5. Paste the token into **Personal access token** and click **Save authentication settings**. The token is stored as a **Mage secret** named `mage_git_access_token_{user_id}` (where `{user_id}` is your Mage user ID).
HTTPS+PAT uses your stored credentials for Git in the [version control terminal](#3-version-control-terminal) the same way OAuth does.
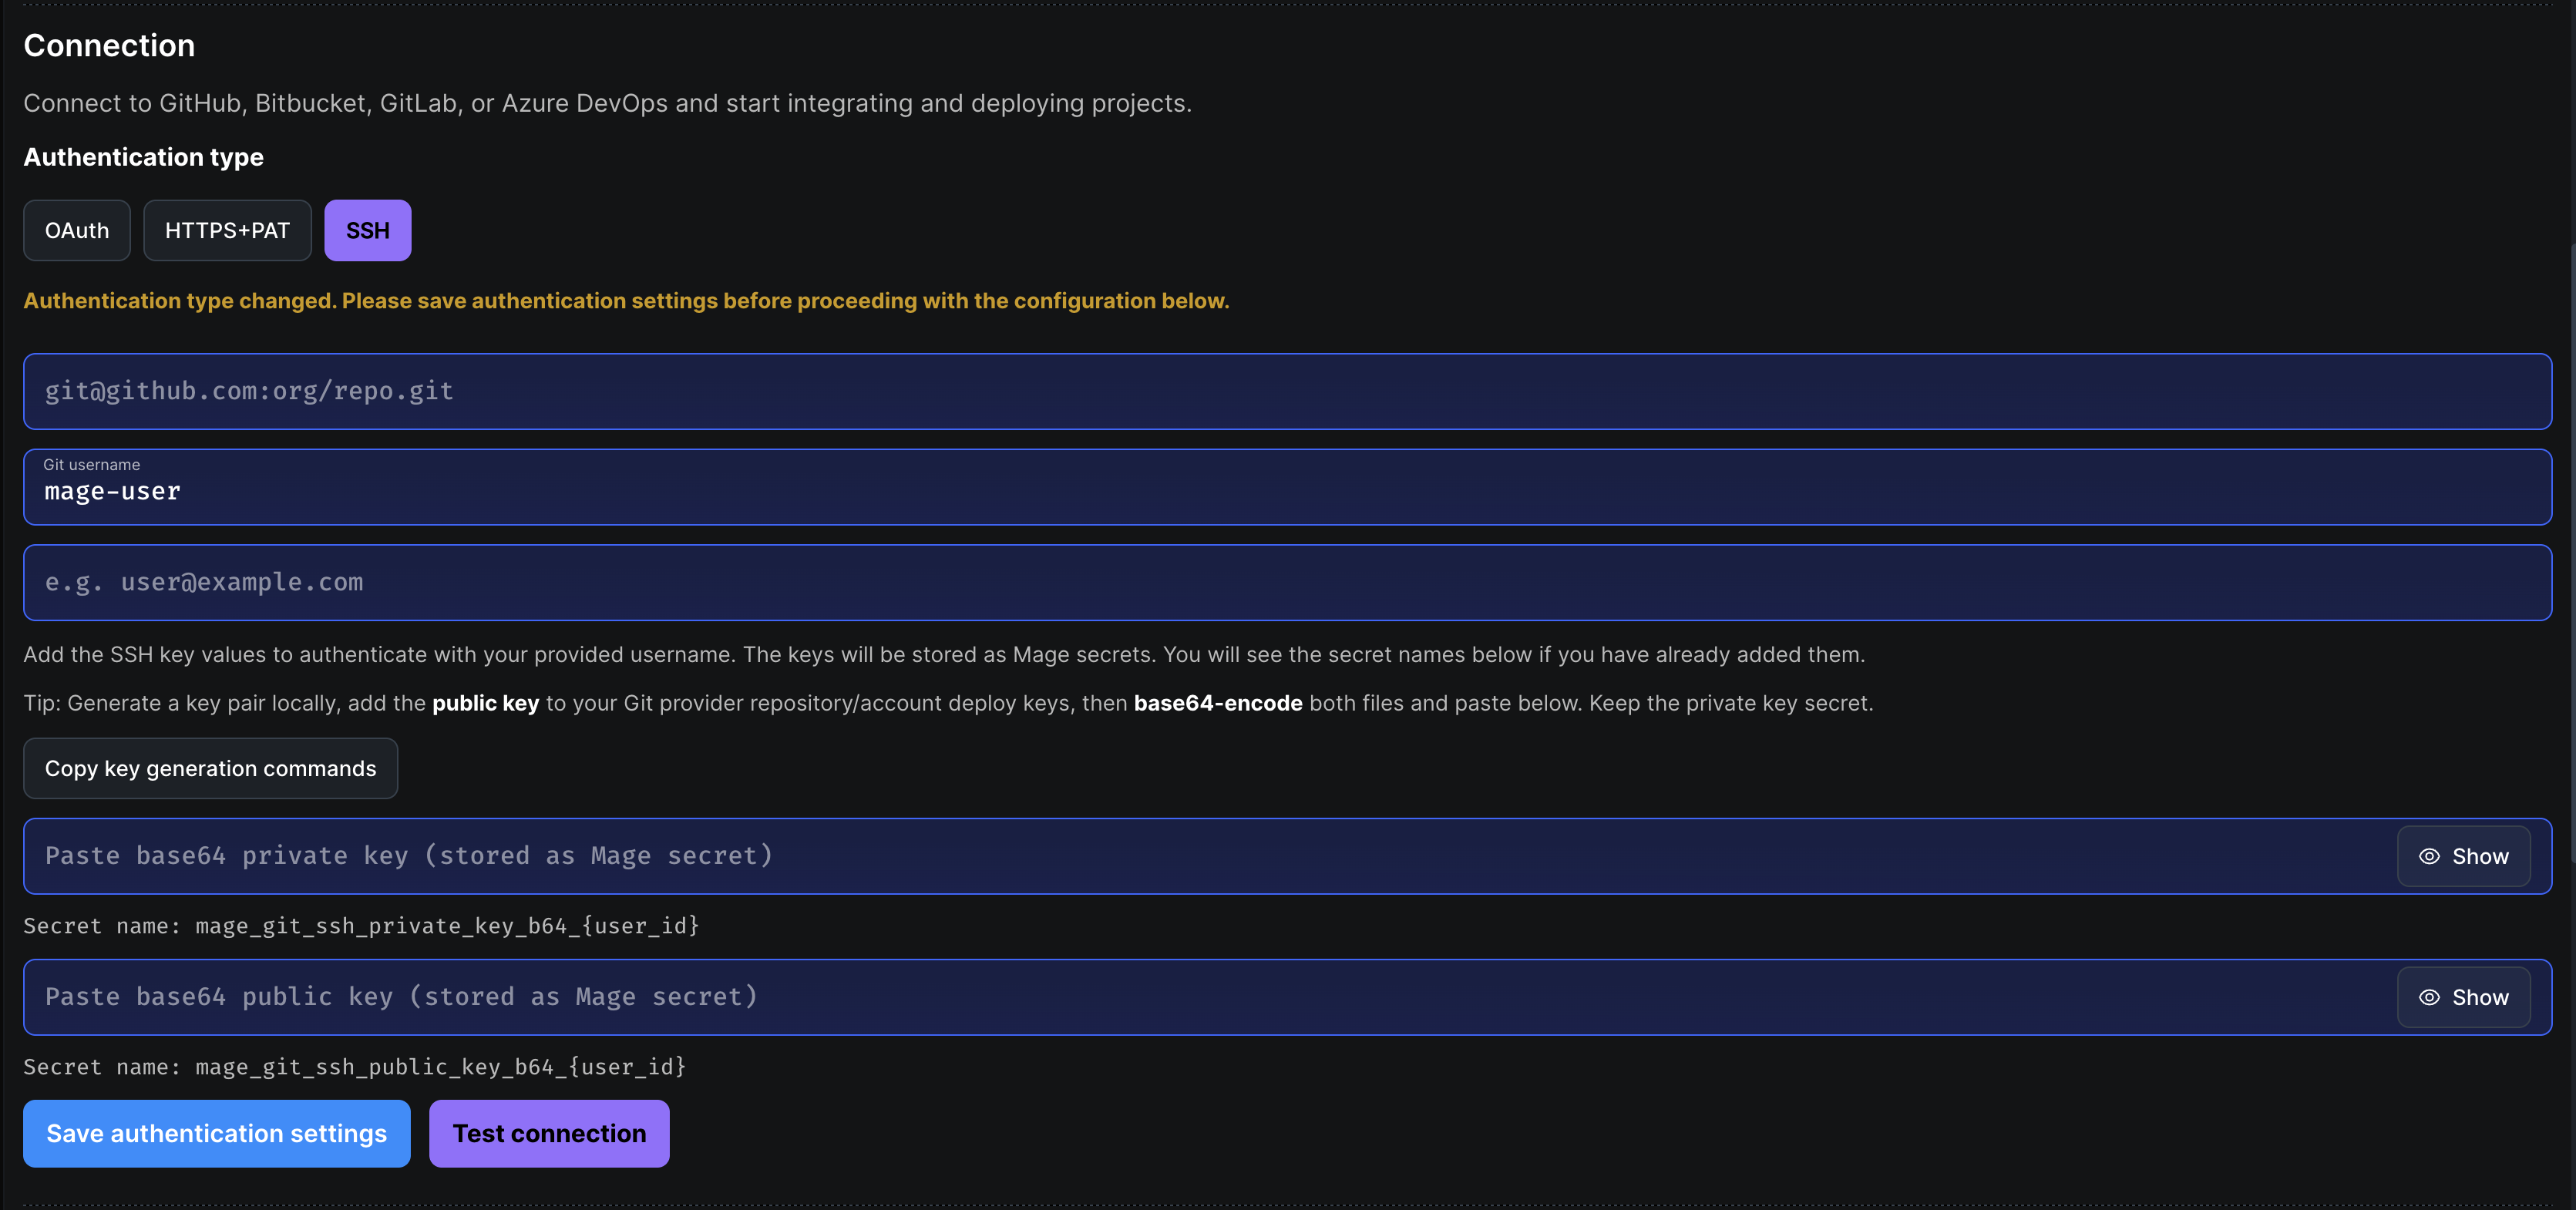
 ### SSH key authentication
1. Under **Connection**, set **Authentication type** to **SSH**.
2. Enter the **remote repository URL** in SSH form (for example `git@github.com:your-org/your-repo.git` or a supported `ssh://` URL from your provider).
3. Enter a **username** and **email** for Git **commit** identity (as shown in `git log`), matching what you use for the repository.
4. Add **SSH public and private key** values. The form expects the key material in **base64** (as labeled in the UI). In your Git host, add the public key as a **deploy key** (repo-scoped) or a user key, with permission to read/write the repo as needed.
5. Click **Save authentication settings**.
### SSH key authentication
1. Under **Connection**, set **Authentication type** to **SSH**.
2. Enter the **remote repository URL** in SSH form (for example `git@github.com:your-org/your-repo.git` or a supported `ssh://` URL from your provider).
3. Enter a **username** and **email** for Git **commit** identity (as shown in `git log`), matching what you use for the repository.
4. Add **SSH public and private key** values. The form expects the key material in **base64** (as labeled in the UI). In your Git host, add the public key as a **deploy key** (repo-scoped) or a user key, with permission to read/write the repo as needed.
5. Click **Save authentication settings**.
 ### GitHub (OAuth)
Mage Pro supports integration with GitHub repositories for version control, collaboration, and deployments. For **HTTPS+PAT** or **SSH**, use [PAT](#https-and-personal-access-token-pat) or [SSH key](#ssh-key-authentication) instead of the GitHub **Connect** OAuth flow below.
**Connect to GitHub using OAuth tokens:**
**Step 1**: Click the **Connect** button to the right of the GitHub connection.
* This will take you to the GitHub sign-in authentication.
### GitHub (OAuth)
Mage Pro supports integration with GitHub repositories for version control, collaboration, and deployments. For **HTTPS+PAT** or **SSH**, use [PAT](#https-and-personal-access-token-pat) or [SSH key](#ssh-key-authentication) instead of the GitHub **Connect** OAuth flow below.
**Connect to GitHub using OAuth tokens:**
**Step 1**: Click the **Connect** button to the right of the GitHub connection.
* This will take you to the GitHub sign-in authentication.
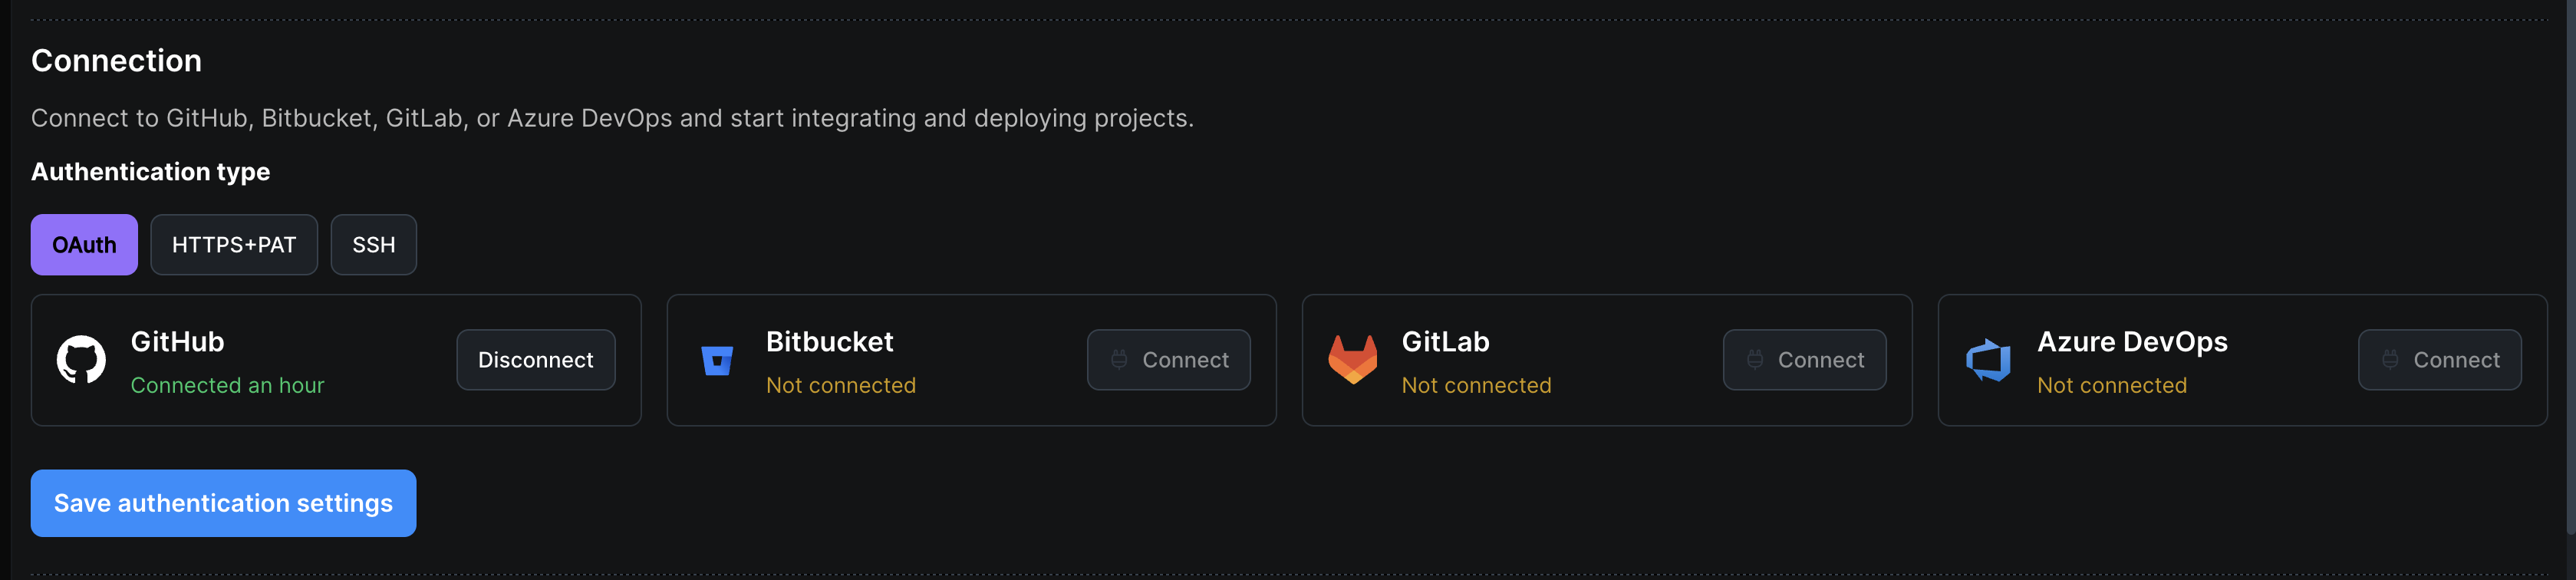 **Step 2**: Sign in with your GitHub login credentials.
* After authenticating you will return to the Mage Pro deployment app.
* You should now see that you are connected to GitHub.
* Click **Save authentication settings**.
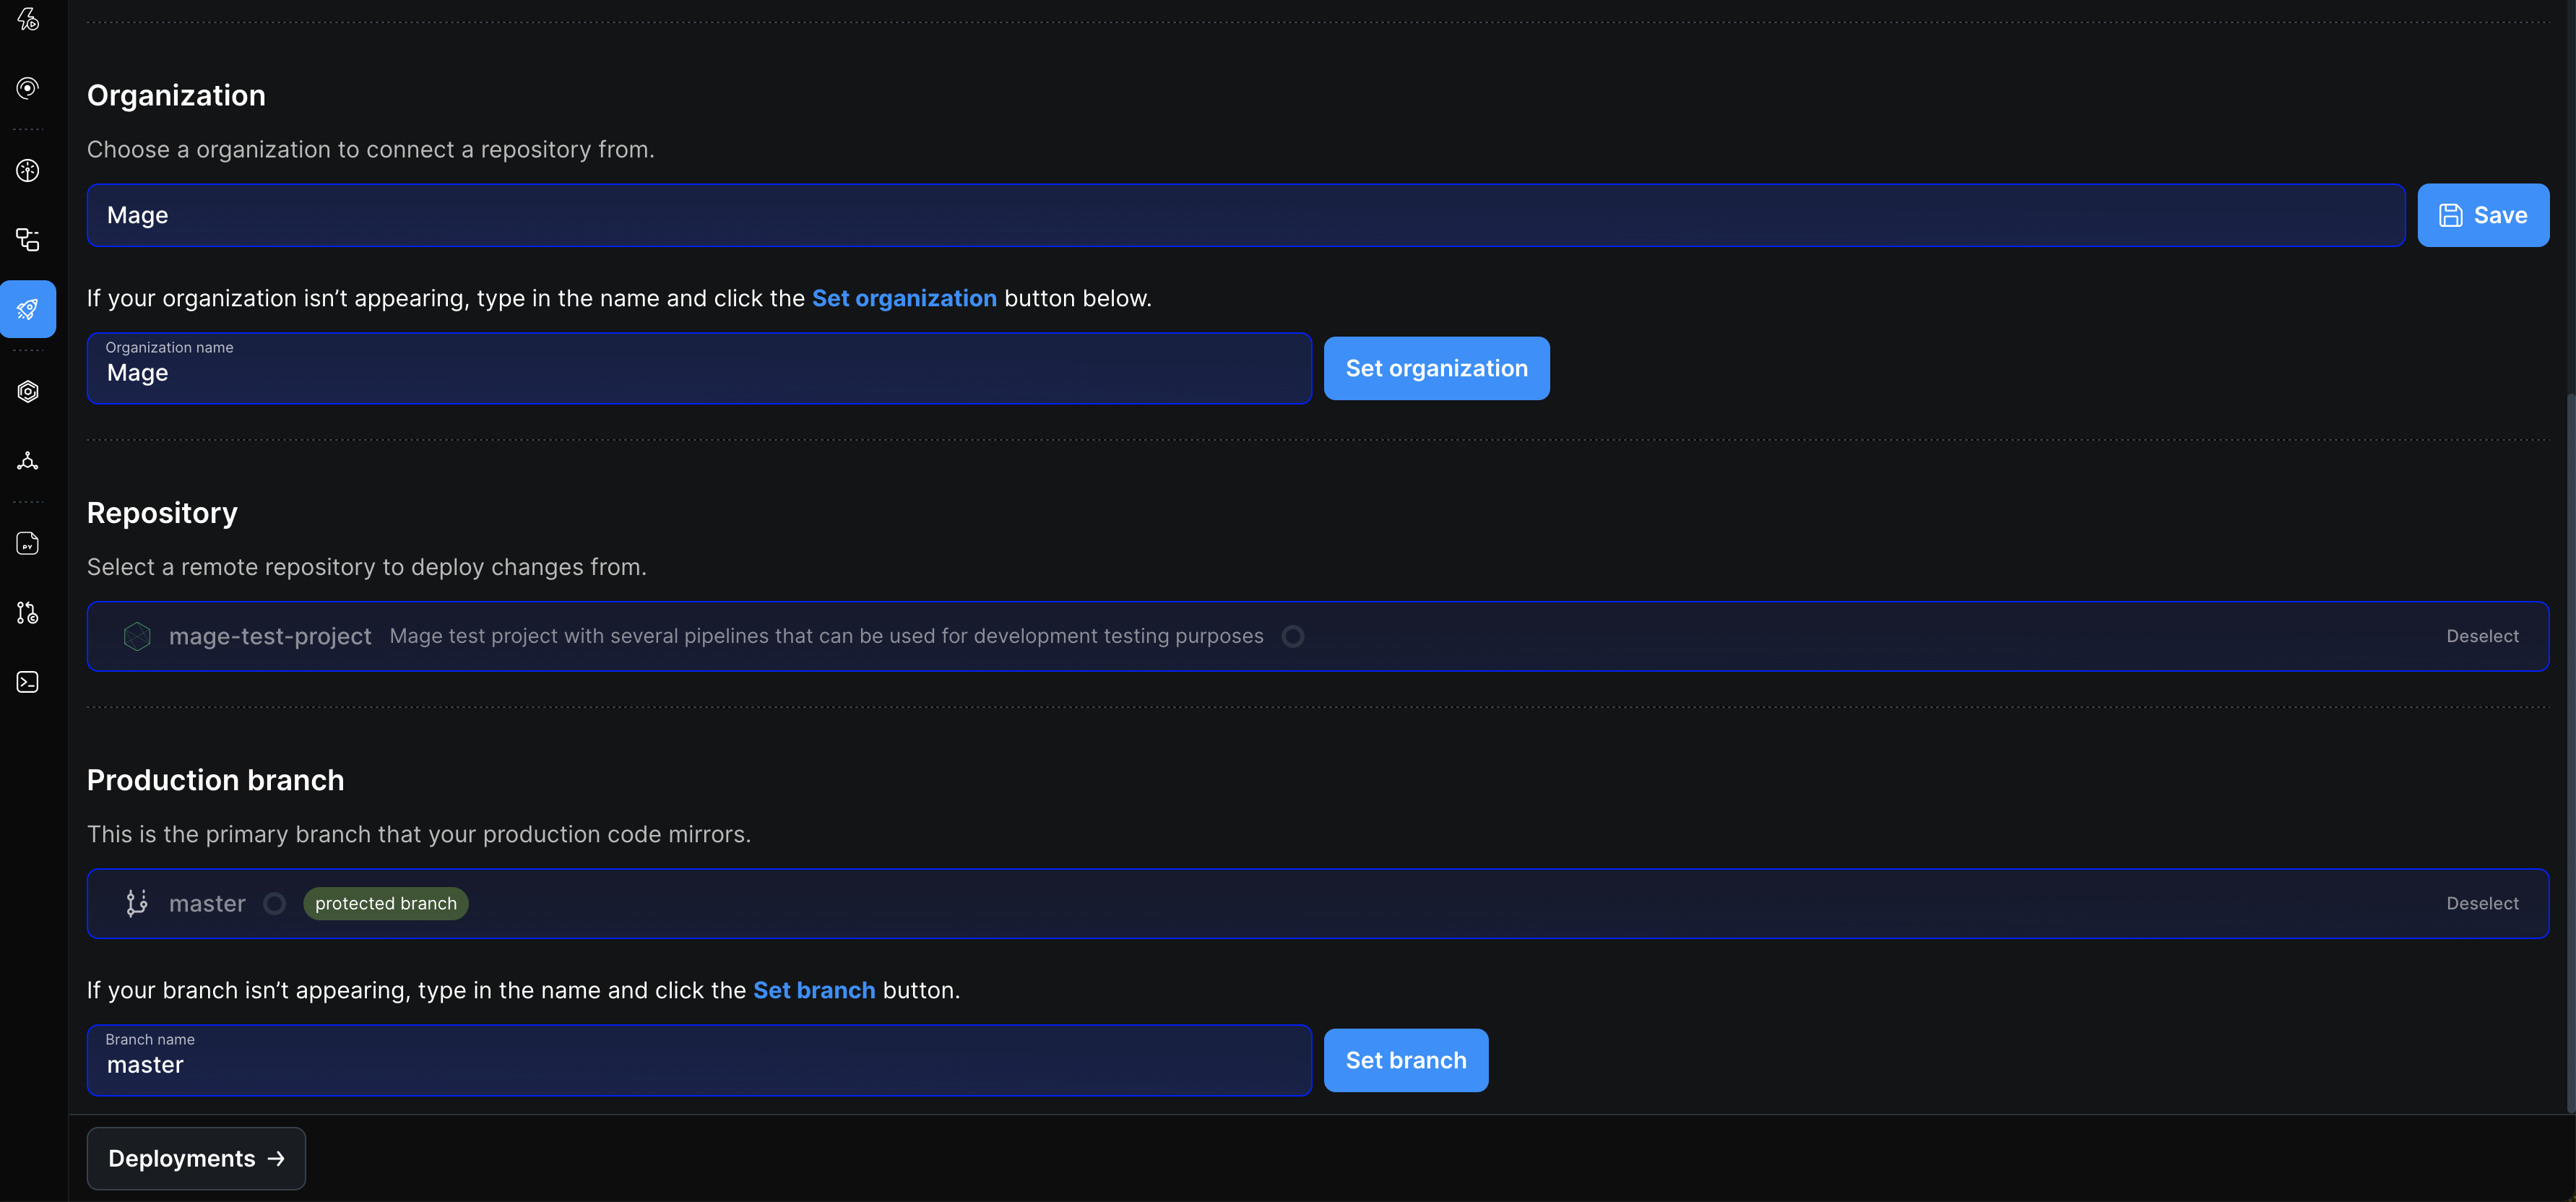
**Step 3**: Select your GitHub organization from the list.
* If your organization isn't appearing, enter the name in the **Organization name** field and click **Set organization**.
**Step 2**: Sign in with your GitHub login credentials.
* After authenticating you will return to the Mage Pro deployment app.
* You should now see that you are connected to GitHub.
* Click **Save authentication settings**.
**Step 3**: Select your GitHub organization from the list.
* If your organization isn't appearing, enter the name in the **Organization name** field and click **Set organization**.
 ### Bitbucket (OAuth)
Mage Pro supports integration with Bitbucket repositories for version control, collaboration, and deployments. For **HTTPS+PAT** or **SSH**, use [PAT](#https-and-personal-access-token-pat) or [SSH key](#ssh-key-authentication) instead of the Bitbucket **Connect** OAuth flow below.
**Connect to Bitbucket using OAuth tokens:**
### Bitbucket (OAuth)
Mage Pro supports integration with Bitbucket repositories for version control, collaboration, and deployments. For **HTTPS+PAT** or **SSH**, use [PAT](#https-and-personal-access-token-pat) or [SSH key](#ssh-key-authentication) instead of the Bitbucket **Connect** OAuth flow below.
**Connect to Bitbucket using OAuth tokens:**
 **Step 1**: Click the **Connect** button to the right of the Bitbucket connection.
* This will take you to the Bitbucket sign-in authentication.
**Step 2**: Sign in with your Bitbucket login credentials.
* After authenticating you will return to the Mage Pro deployment app.
* You should now see that you are connected to Bitbucket.
* Click **Save authentication settings**.
**Step 1**: Click the **Connect** button to the right of the Bitbucket connection.
* This will take you to the Bitbucket sign-in authentication.
**Step 2**: Sign in with your Bitbucket login credentials.
* After authenticating you will return to the Mage Pro deployment app.
* You should now see that you are connected to Bitbucket.
* Click **Save authentication settings**.
 **Step 3**: Select your Bitbucket workspace from the dropdown list.
* If there are no workspaces listed, enter a workspace slug in the text field below and click **Set workspace**.
**Step 4**: Select the repository from the dropdown menu.
* You should see a list of all the repositories in that workspace.
**Step 5**: Select the production branch from the dropdown list.
* The production branch is the primary branch your production code will mirror.
**Step 3**: Select your Bitbucket workspace from the dropdown list.
* If there are no workspaces listed, enter a workspace slug in the text field below and click **Set workspace**.
**Step 4**: Select the repository from the dropdown menu.
* You should see a list of all the repositories in that workspace.
**Step 5**: Select the production branch from the dropdown list.
* The production branch is the primary branch your production code will mirror.
 ### GitLab (OAuth)
Mage Pro supports integration with GitLab repositories for version control, collaboration, and deployments. For **HTTPS+PAT** or **SSH**, use [PAT](#https-and-personal-access-token-pat) or [SSH key](#ssh-key-authentication) instead of the **Connect** GitLab OAuth flow below.
**Connect to GitLab using OAuth tokens:**
**Step 1**: Click the **Connect** button to the right of the GitLab connection.
* This will take you to the GitLab sign-in authentication.
**Step 2**: Sign in with your GitLab login credentials.
* After authenticating you will return to the Mage Pro deployment app.
* You should now see that you are connected to GitLab.
* Click **Save authentication settings**.
### GitLab (OAuth)
Mage Pro supports integration with GitLab repositories for version control, collaboration, and deployments. For **HTTPS+PAT** or **SSH**, use [PAT](#https-and-personal-access-token-pat) or [SSH key](#ssh-key-authentication) instead of the **Connect** GitLab OAuth flow below.
**Connect to GitLab using OAuth tokens:**
**Step 1**: Click the **Connect** button to the right of the GitLab connection.
* This will take you to the GitLab sign-in authentication.
**Step 2**: Sign in with your GitLab login credentials.
* After authenticating you will return to the Mage Pro deployment app.
* You should now see that you are connected to GitLab.
* Click **Save authentication settings**.
 **Step 3**: Select your GitLab group from the dropdown list.
* If there are no groups listed, enter a group name in the text field below and click **Set group**.
**Step 4**: Select the repository from the dropdown menu.
* You should see a list of all the repositories in that group.
**Step 5**: Select the production branch from the dropdown list.
* The production branch is the primary branch your production code will mirror.
### Azure DevOps (OAuth)
Mage Pro supports integration with Azure DevOps repositories for version control, collaboration, and deployments. For **HTTPS+PAT** or **SSH**, use [PAT](#https-and-personal-access-token-pat) or [SSH key](#ssh-key-authentication) instead of the Azure DevOps **Connect** OAuth flow below.
**Connect to Azure DevOps using OAuth tokens:**
**Step 1**: Click the **Connect** button to the right of the Azure DevOps connection.
* This will take you to the Azure DevOps sign-in authentication.
**Step 2**: Sign in with your Azure DevOps credentials.
* After authenticating you will return to the Mage Pro deployment app.
* You should now see that you are connected to Azure DevOps.
* Click **Save authentication settings**.
**Step 3**: Select your GitLab group from the dropdown list.
* If there are no groups listed, enter a group name in the text field below and click **Set group**.
**Step 4**: Select the repository from the dropdown menu.
* You should see a list of all the repositories in that group.
**Step 5**: Select the production branch from the dropdown list.
* The production branch is the primary branch your production code will mirror.
### Azure DevOps (OAuth)
Mage Pro supports integration with Azure DevOps repositories for version control, collaboration, and deployments. For **HTTPS+PAT** or **SSH**, use [PAT](#https-and-personal-access-token-pat) or [SSH key](#ssh-key-authentication) instead of the Azure DevOps **Connect** OAuth flow below.
**Connect to Azure DevOps using OAuth tokens:**
**Step 1**: Click the **Connect** button to the right of the Azure DevOps connection.
* This will take you to the Azure DevOps sign-in authentication.
**Step 2**: Sign in with your Azure DevOps credentials.
* After authenticating you will return to the Mage Pro deployment app.
* You should now see that you are connected to Azure DevOps.
* Click **Save authentication settings**.
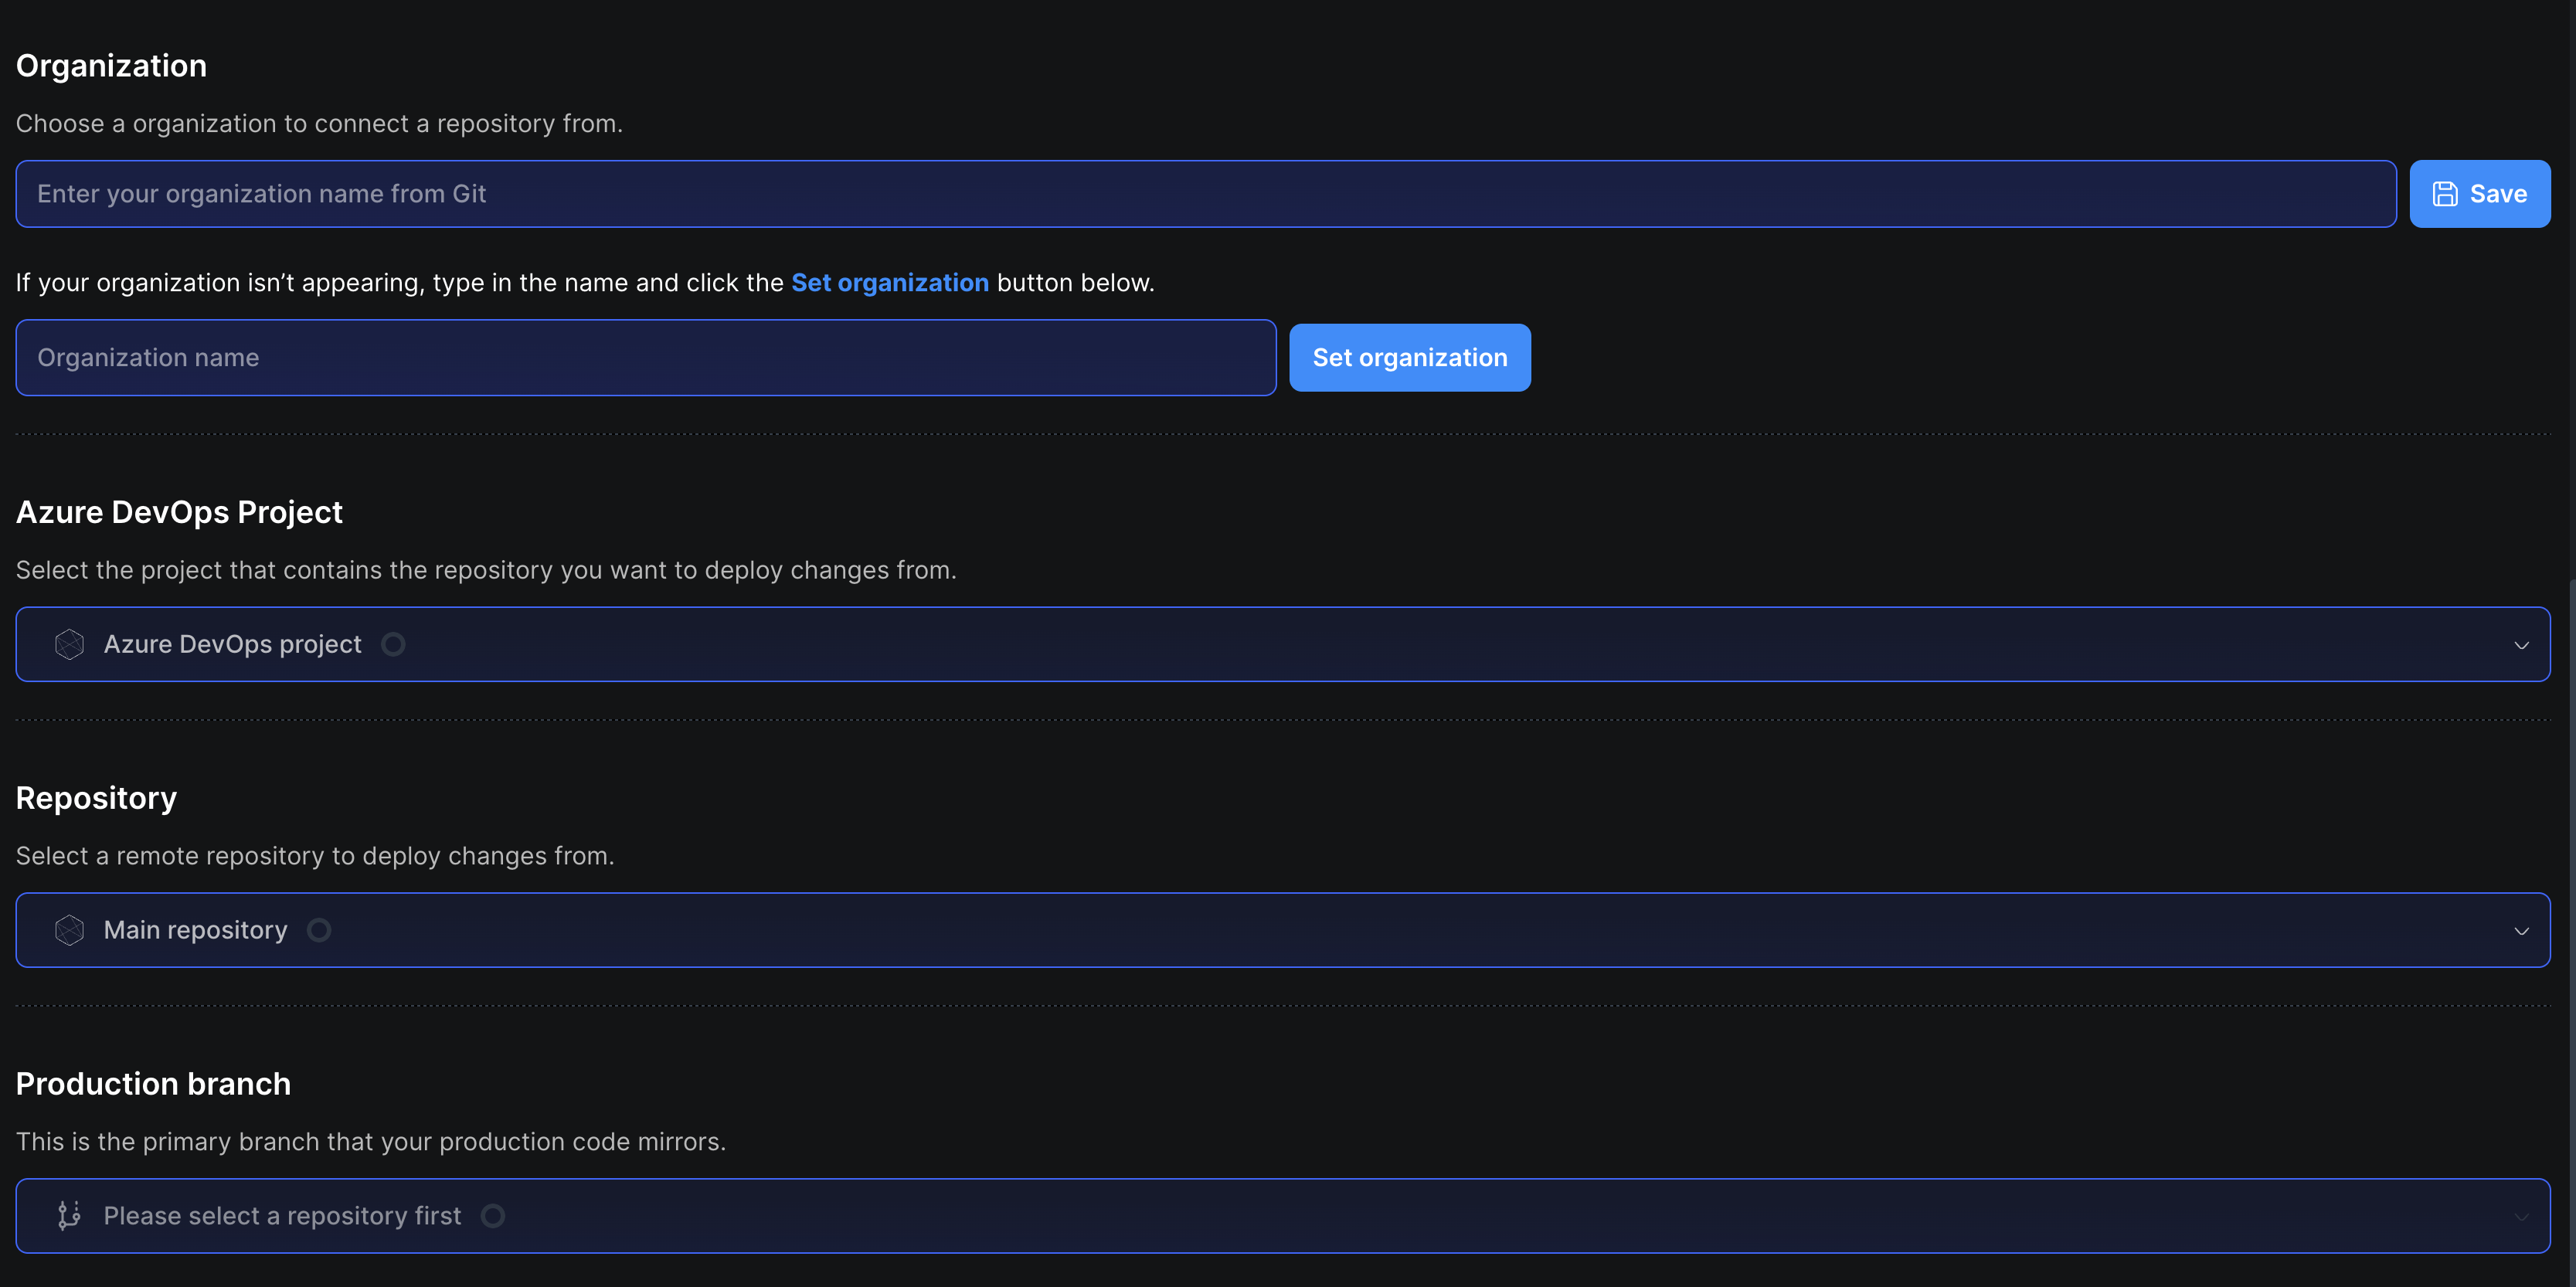 **Step 3**: Select your Azure DevOps **organization** from the dropdown, or type the organization name directly in the text field and click **Save**.
* If your organization isn't appearing in the dropdown, enter the name in the **Organization name** field and click **Set organization**.
**Step 4**: Select your **Azure DevOps project** from the dropdown.
* This is the project that contains the repository you want to deploy changes from.
**Step 5**: Select the **repository** from the dropdown.
* You should see a list of all repositories in that project.
**Step 6**: Select the **production branch** from the dropdown.
* This is the primary branch your production code will mirror.
* If your branch isn't listed, type the branch name into the text field and click **Set branch**.
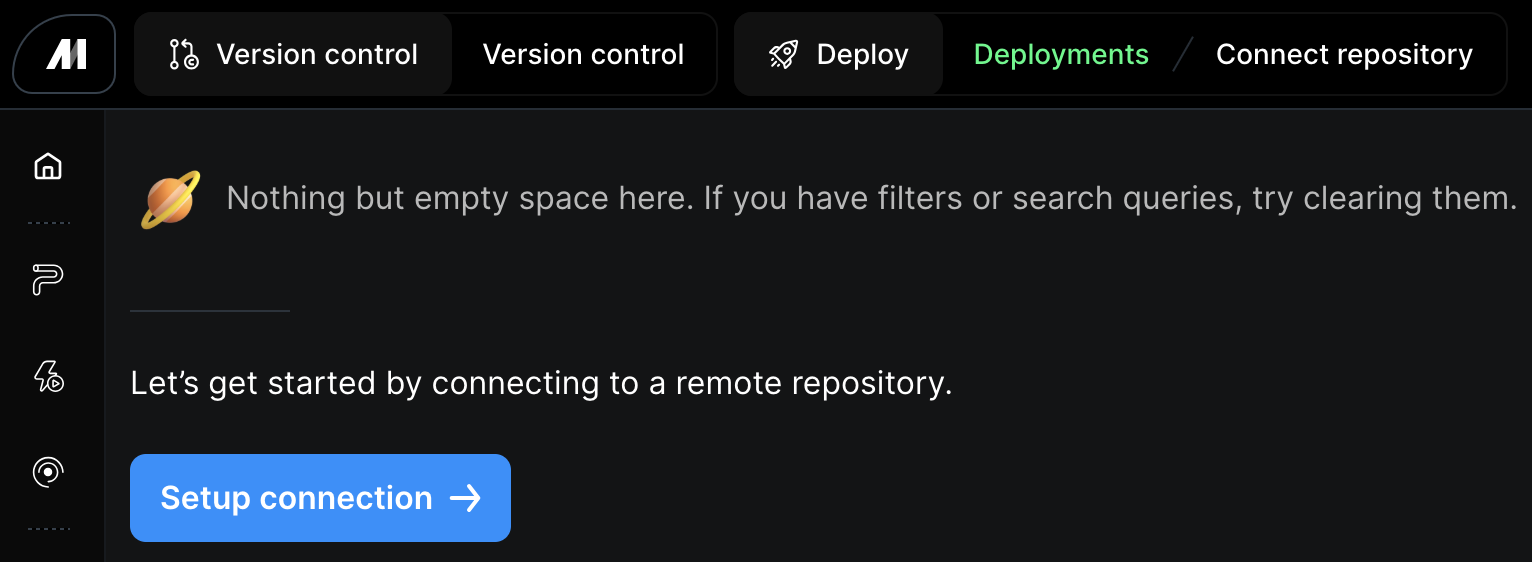
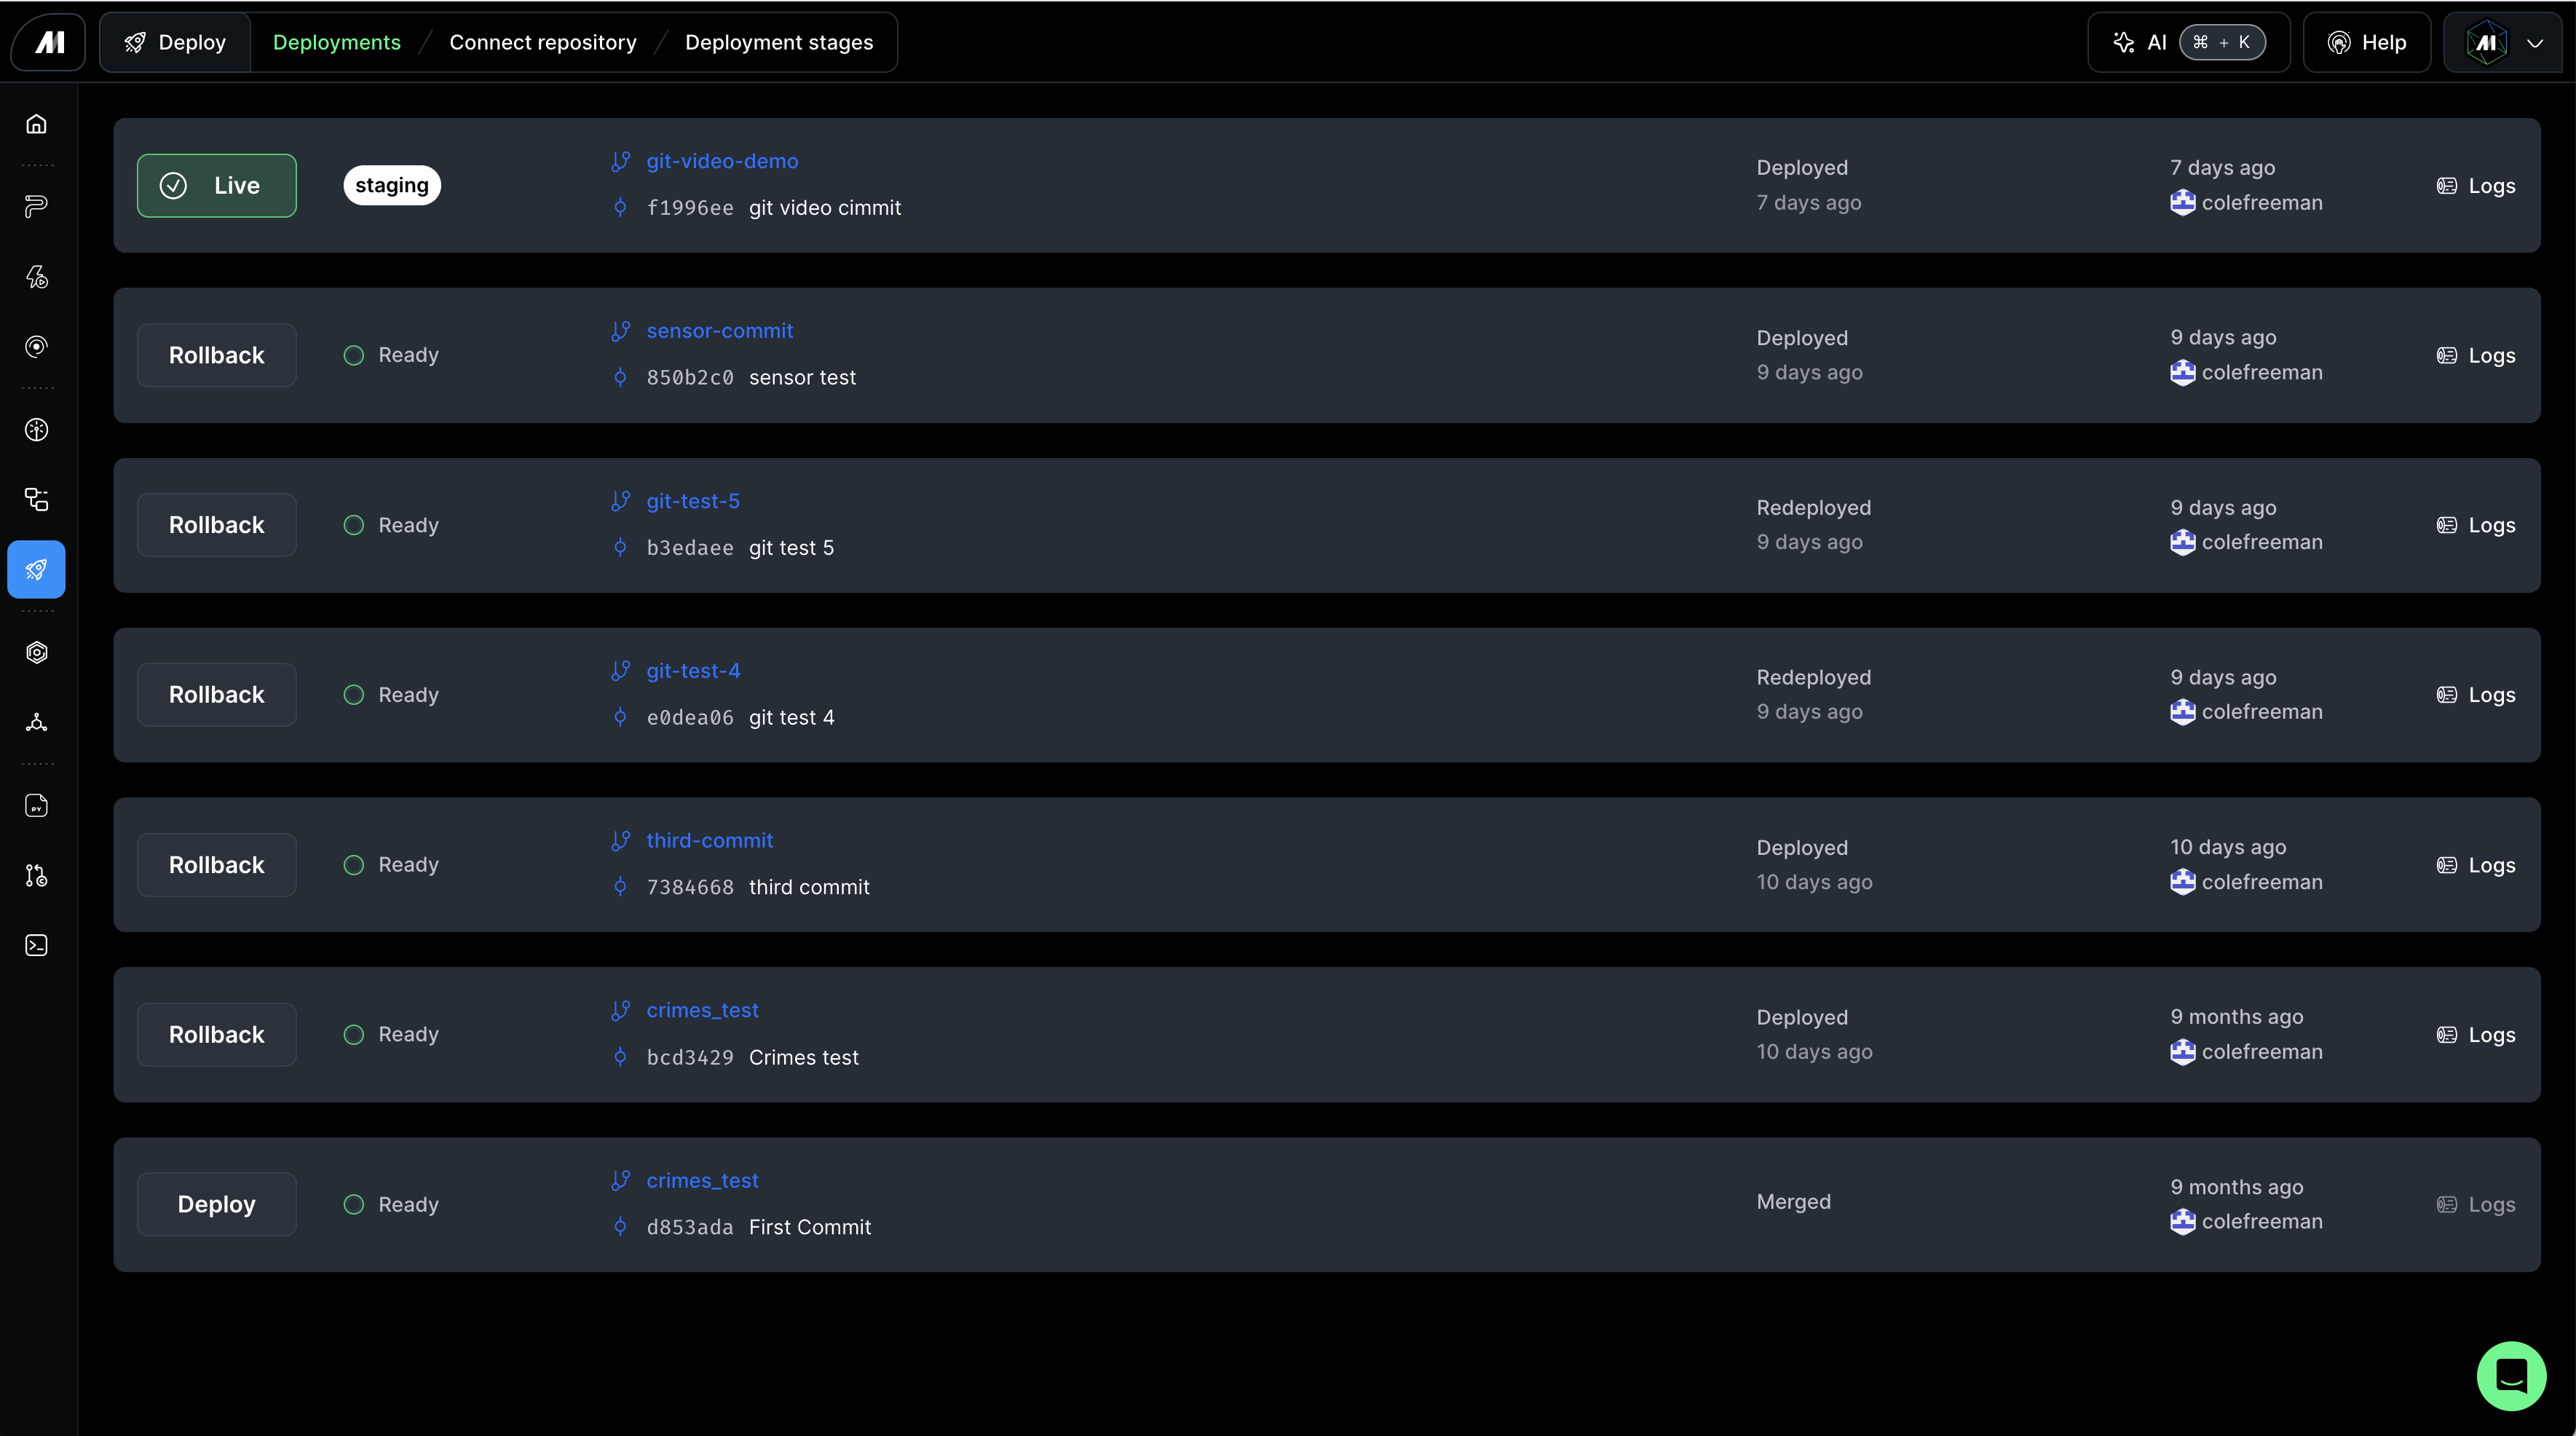
## 2. Deployments App
The Deployments app is the control surface for [deploying](#merge-pull-request-and-deploy) merged work from Git to your Mage Pro cluster. It assumes you have already completed [authentication](#1-authentication).
### Merge pull request and deploy
Once you push code to your Git branch, open your Git provider and merge the pull request. When the merge is done, the deployment is available in the Deployments app.
Mage then deploys a chosen commit to your environment:
1. In Mage, go to the **Deployments** view and open the deployments list (highlighted in green at the top when updates are available).
2. Click **Deploy** to ship the version you just merged. Use **Rollback** to deploy an earlier commit if you need to revert.
**Step 3**: Select your Azure DevOps **organization** from the dropdown, or type the organization name directly in the text field and click **Save**.
* If your organization isn't appearing in the dropdown, enter the name in the **Organization name** field and click **Set organization**.
**Step 4**: Select your **Azure DevOps project** from the dropdown.
* This is the project that contains the repository you want to deploy changes from.
**Step 5**: Select the **repository** from the dropdown.
* You should see a list of all repositories in that project.
**Step 6**: Select the **production branch** from the dropdown.
* This is the primary branch your production code will mirror.
* If your branch isn't listed, type the branch name into the text field and click **Set branch**.
## 2. Deployments App
The Deployments app is the control surface for [deploying](#merge-pull-request-and-deploy) merged work from Git to your Mage Pro cluster. It assumes you have already completed [authentication](#1-authentication).
### Merge pull request and deploy
Once you push code to your Git branch, open your Git provider and merge the pull request. When the merge is done, the deployment is available in the Deployments app.
Mage then deploys a chosen commit to your environment:
1. In Mage, go to the **Deployments** view and open the deployments list (highlighted in green at the top when updates are available).
2. Click **Deploy** to ship the version you just merged. Use **Rollback** to deploy an earlier commit if you need to revert.
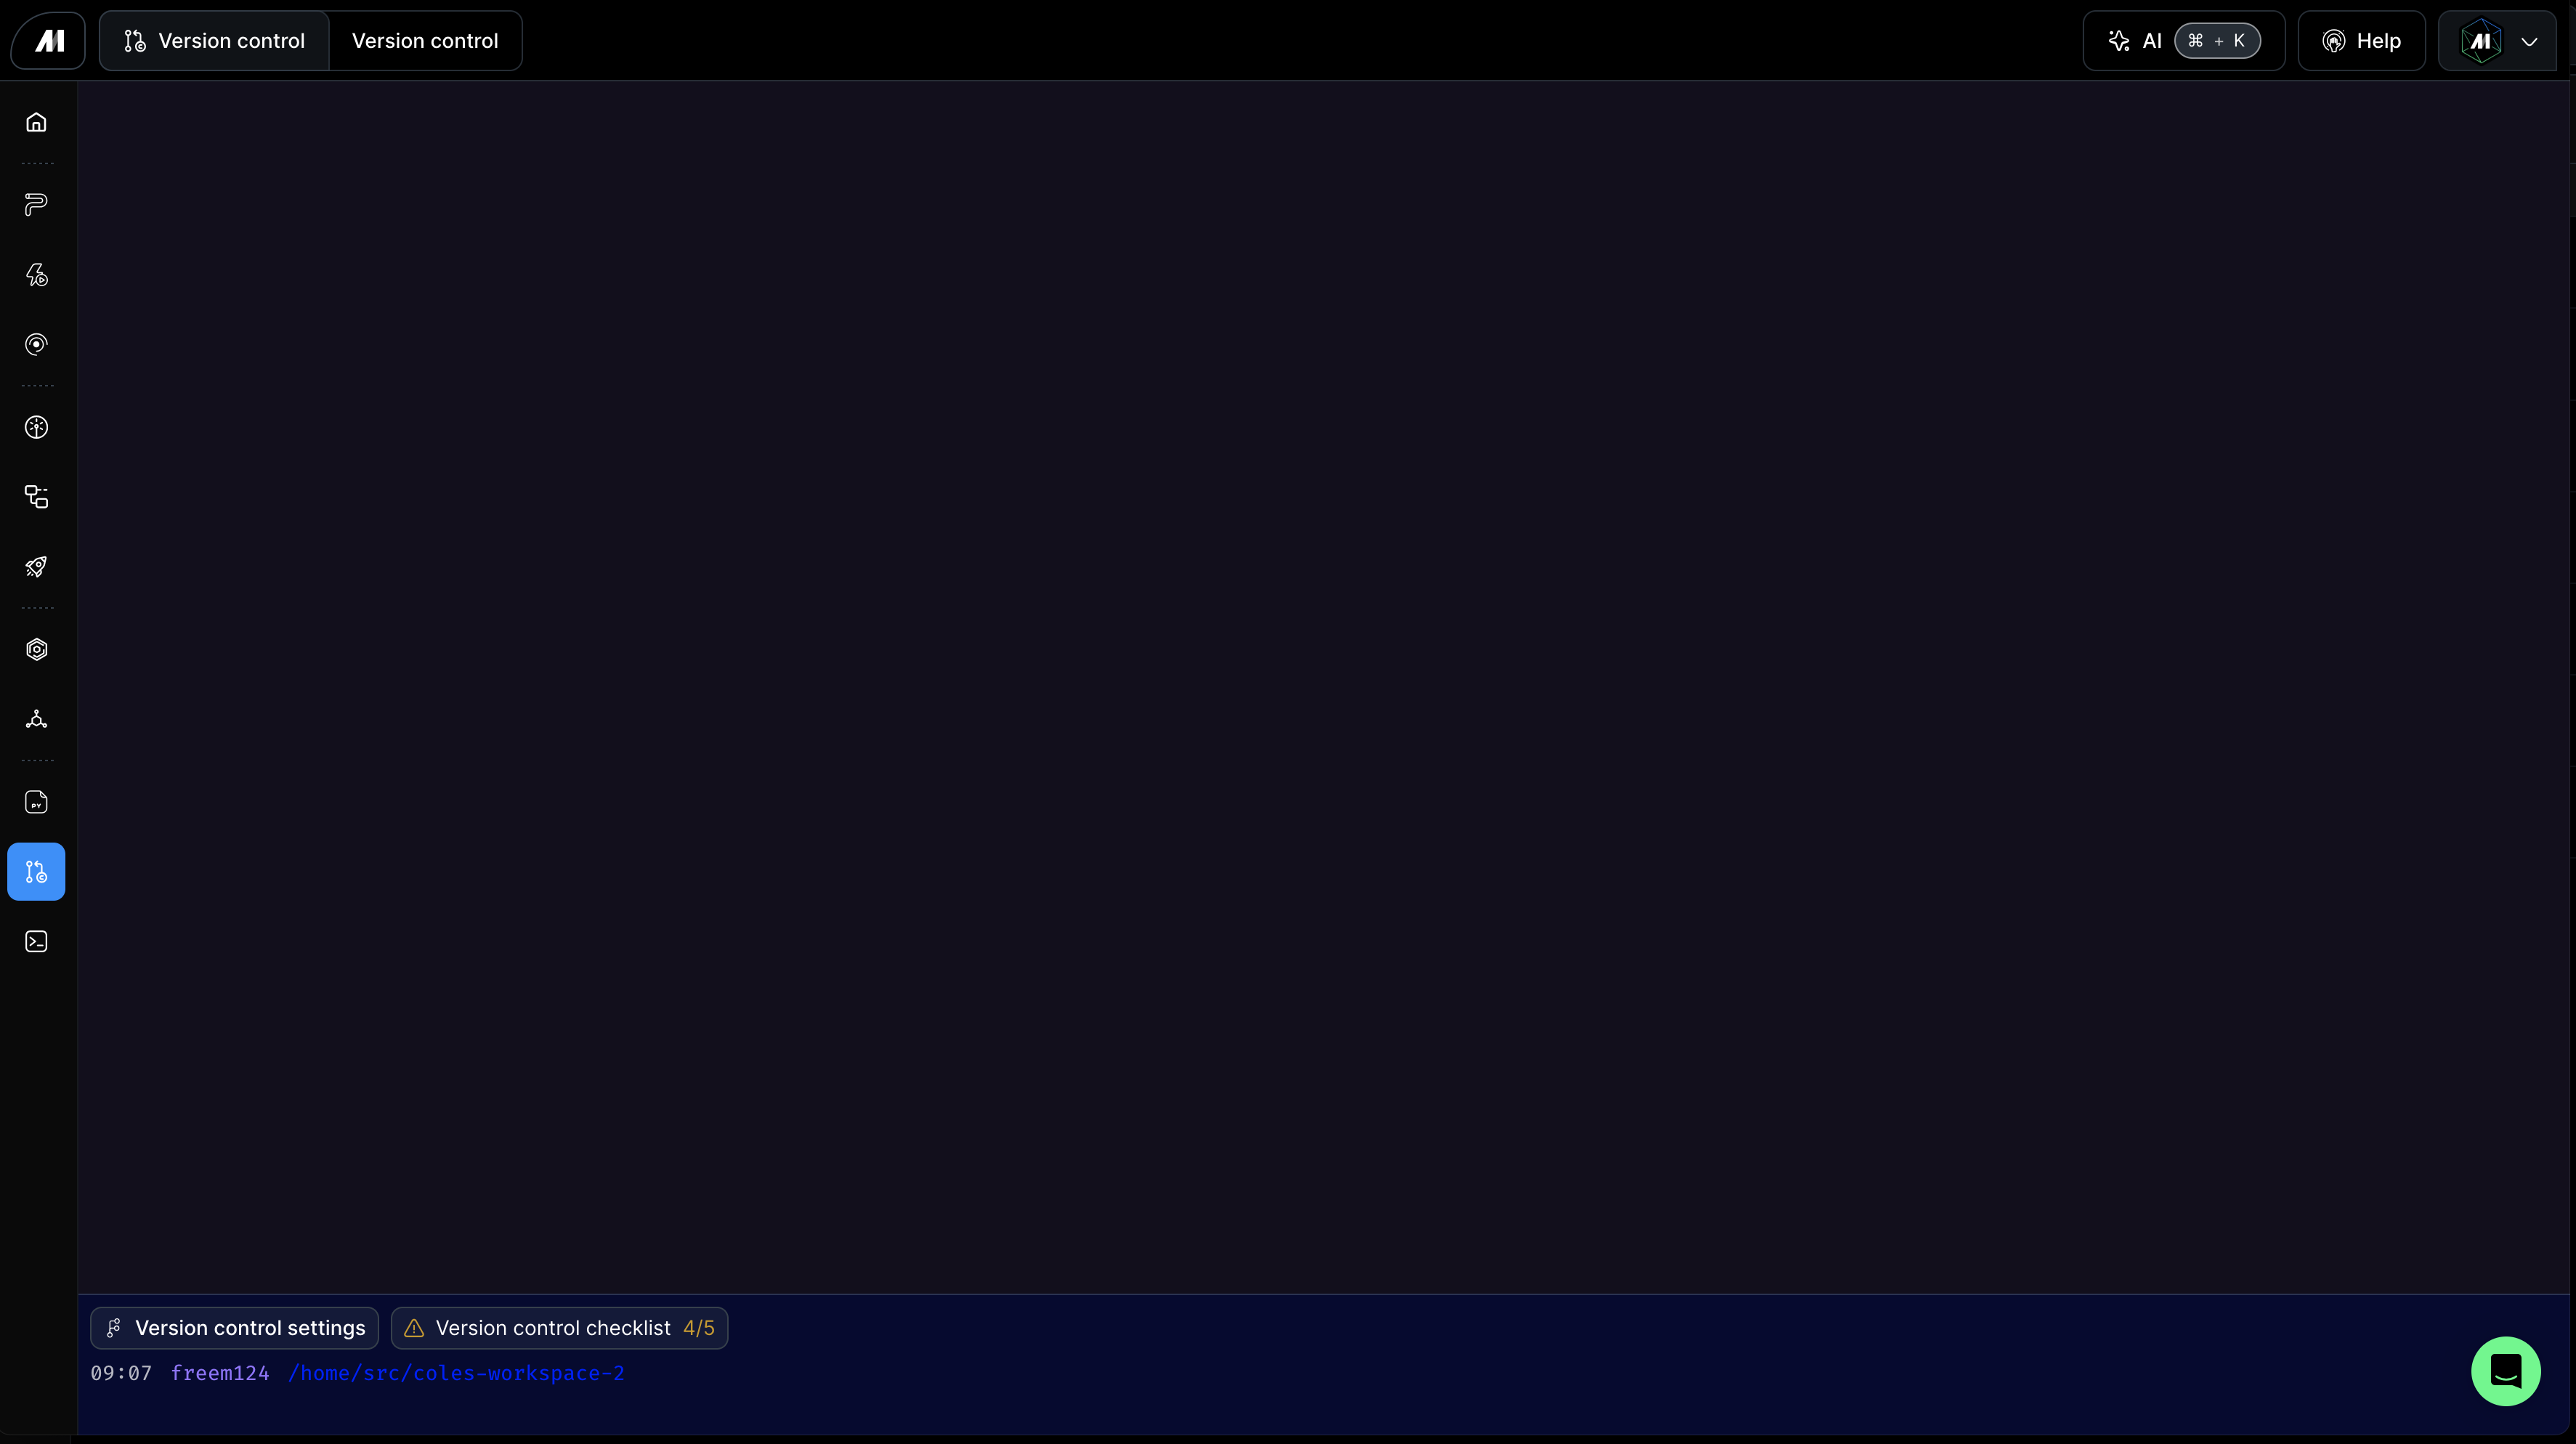
 ## 3. Version control terminal
Once you have completed [Authentication](#1-authentication), you can use standard Git in the browser: status, commit, push, pull, and branch operations against your configured remote.
### Troubleshooting Git commands
When running Git commands, you may run into a few common issues:
* Make sure you are in the correct folder: `/home/src/
## 3. Version control terminal
Once you have completed [Authentication](#1-authentication), you can use standard Git in the browser: status, commit, push, pull, and branch operations against your configured remote.
### Troubleshooting Git commands
When running Git commands, you may run into a few common issues:
* Make sure you are in the correct folder: `/home/src/