> ## Documentation Index
> Fetch the complete documentation index at: https://docs.mage.ai/llms.txt
> Use this file to discover all available pages before exploring further.
# Quickstart
> Go from zero to Mage hero in under a minute. We'll walk you through installing Mage and running your first pipeline. 🦸♀️
export const ProBanner = ({button = 'Try Mage Pro for free', description, source = 'documentation', title = 'Our fully managed solution for teams is now available!'}) =>
;
## Mage Pro overview
After creating a Mage Pro account or logging into Mage Pro you are directed to the cluster management portal. Here you can manage
your Mage clusters.
### Cluster Pages
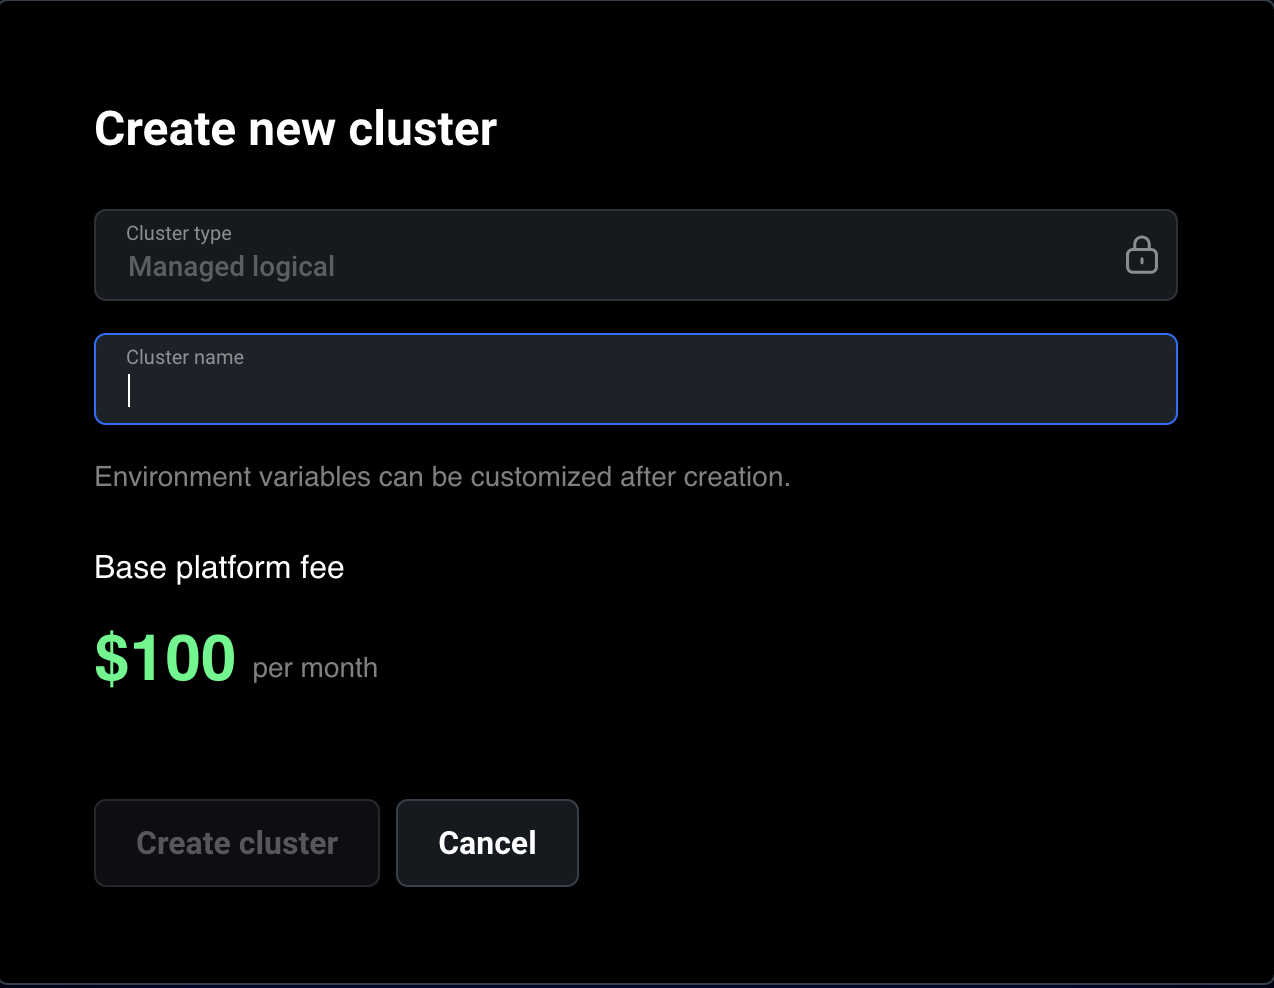
1. **Creating a New Cluster**:
* On the clusters page, you can create a new cluster by clicking the "Launch new cluster" button.
* Fill in the required field **Cluster Name**. Note that environment variables can be customized after the cluster is created.
If you are in a free trial you are limited to a single cluster.
2. **Viewing Cluster List**:
* The cluster list page provides an overview of all your clusters, displaying essential information such as the cluster status, ID, UUID, cloud provider, and the number of replicas.
3. **Cluster Details**:
* Click the "Open cluster" button to view detailed information about the cluster. Here, you can see various metrics and statuses that help you monitor and manage your cluster effectively.
* Follow the [environment variables](/development/variables/environment-variables) documentation to customize your Mage Pro cluster.
### Cluster login
1. **Accessing the cluster**:
* Click the "Open cluster" button to navigate to the actual Mage cluster page. Here, you can interact with your cluster and use the Mage tool as you normally would.
* Currently, we use separate databases for each cluster for enhanced security. The users credentials in the Mage Pro cluster are managed inside the cluster. Use the default owner credentials (email: [admin@admin.com](mailto:admin@admin.com), password: **admin**) to log in. After you login, you should either update the password of the default owner user or create your own owner user.
Credentials may differ from cluster portal. For initial setup use Email or username: [admin@admin.com](mailto:admin@admin.com), Password: admin.
### Run your first pipeline
* **Step 1**: From the pipeline editor page click the "New pipeline" button
* **Step 2**: Select a template for inspiration or start from scratch by clicking the "Start from scratch" button
* **Step 3**: Select your pipeline type and give it an optional new name, description, and tag
* **Step 4**: Click the create new pipeline button
* **Step 5**: Add your blocks by following the Youtube video below
## ⛵️ Mage OSS overview
We recommend using Docker to get started.
Docker is a tool that allows you to run Mage in a containerized environment: you can run Mage on any operating system that supports Docker, including Windows, Mac, and Linux. Using Docker means that you don't have to worry about installing dependencies or configuring your environment. If you'd like to install Mage without Docker, you can use `pip` or `conda`.
If you're familiar with [Docker Compose](https://docs.docker.com/compose/) or plan on adding or extending images (e.g. Postgres) in your project, we recommend starting from the *Docker compose template*. Otherwise, we recommend *Docker run*.
## 🪄 Get Mage
### Get started
First, be sure [Docker](https://docs.docker.com/engine/install/) is installed. Next, create a new folder for your project, change directory into that folder, and run the following from your terminal:
```bash Mac/Linux theme={"system"}
docker run -it -p 6789:6789 -v $(pwd):/home/src mageai/mageai /app/run_app.sh mage start [project_name]
```
```bash Windows Command Line theme={"system"}
docker run -it -p 6789:6789 -v "%cd%:/home/src" mageai/mageai /app/run_app.sh mage start [project_name]
```
```bash PowerShell theme={"system"}
docker run -it -p 6789:6789 -v ${PWD}:/home/src mageai/mageai /app/run_app.sh mage start [project_name]
```
```bash GCP VM Instance theme={"system"}
sudo docker run -it -p 6789:6789 -v $(pwd):/home/src mageai/mageai /app/run_app.sh mage start [project_name]
```
Once the server is running, open `http://localhost:6789` in your browser and explore! If using any cloud provider use external IP address with the port eg 123.456.78:6789. We recommend one of our [guides](/guides/overview) for inspiration.
### What's happening?
We're executing `docker run`, which runs a Docker container from the Mage image. additionally, we're *mounting a volume* (the `-v` command) to persist our project files on our container. This mounts the current folder to `/home/src` in the mage container. We're executing our docker image `mageai/mageai` and running a script to start up the container.
### Get started
The following is useful if you plan on customizing your image or adding additional services to a Docker network with Mage. Read more about Docker compose [here](https://docs.docker.com/compose/).
Be sure that [Docker](https://docs.docker.com/engine/install/) and [Git](https://git-scm.com/book/en/v2/Getting-Started-Installing-Git) are installed and run:
```bash Mac/Linux theme={"system"}
git clone https://github.com/mage-ai/compose-quickstart.git mage-quickstart \
&& cd mage-quickstart \
&& cp dev.env .env && rm dev.env \
&& docker compose up
```
```bash Windows theme={"system"}
git clone https://github.com/mage-ai/compose-quickstart.git mage-quickstart
cd mage-quickstart
cp dev.env .env
rm dev.env
docker compose up
```
```Windows powershell/cmd theme={"system"}
git clone https://github.com/mage-ai/compose-quickstart.git mage-quickstart
cd mage-quickstart
copy dev.env .env
del dev.env
docker compose up
```
Once the server is running, open `http://localhost:6789` in your browser and explore! We recommend one of our [guides](/guides/overview) to for inspiration.
### What's happening?
We're cloning our Docker Compose [quickstart repo](https://github.com/mage-ai/compose-quickstart.git), copying `dev.env` to `.env`, which is ignored by git in our configuration (to avoid exposing secrets), then running `docker compose up` to start a Mage server.
```bash pip theme={"system"}
pip install mage-ai
```
```bash conda theme={"system"}
conda install -c conda-forge mage-ai
```
If you're installing on Linux and need help, check out this [community provided video walkthrough](https://www.youtube.com/watch?v=WVH7LHqND1I).
```bash theme={"system"}
mage start [project_name]
```
Open [http://localhost:6789](http://localhost:6789) in your browser.
[Enable Kubernetes](https://docs.docker.com/desktop/kubernetes/#enable-kubernetes) in Docker Desktop to start a Kubernetes cluster locally. Other options for starting a Kubernetes cluster locally are [Kind](https://kind.sigs.k8s.io/docs/user/quick-start/) and [Minikube](https://minikube.sigs.k8s.io/docs/start/)
First, download the Mage Kubernetes config file [here](https://github.com/mage-ai/mage-ai/blob/master/kube/app.yaml).
Then, replace the `/path/to/mage_project` in the config yaml with the path that you want to use to store your Mage projects.
Install the command line tool, [kubectl](https://kubernetes.io/docs/tasks/tools/#kubectl), if you haven't already.
Run the command `kubectl create -f kube/app.yaml` to run Mage in a Kubernetes pod. You can check the pod status with command `kubectl get pods -o wide`.
Set up port forwarding with command `kubectl port-forward mage-server 6789:6789`.
Open [http://localhost:6789](http://localhost:6789) in your browser.
## Default login credentials
Starting with **Mage OSS v0.9.78 and above**, and in **Mage Pro**,
**user authentication is enabled by default**.
When you first start Mage, the default login credentials are:
| Field | Value |
| -------- | ----------------- |
| Email | `admin@admin.com` |
| Password | `admin` |
⚠️ **Important:** After logging in for the first time, we strongly recommend changing the default password or creating new user accounts for your team. See [User authentication](/production/authentication/overview) for more details.
## 🏃♂️ Run your first pipeline
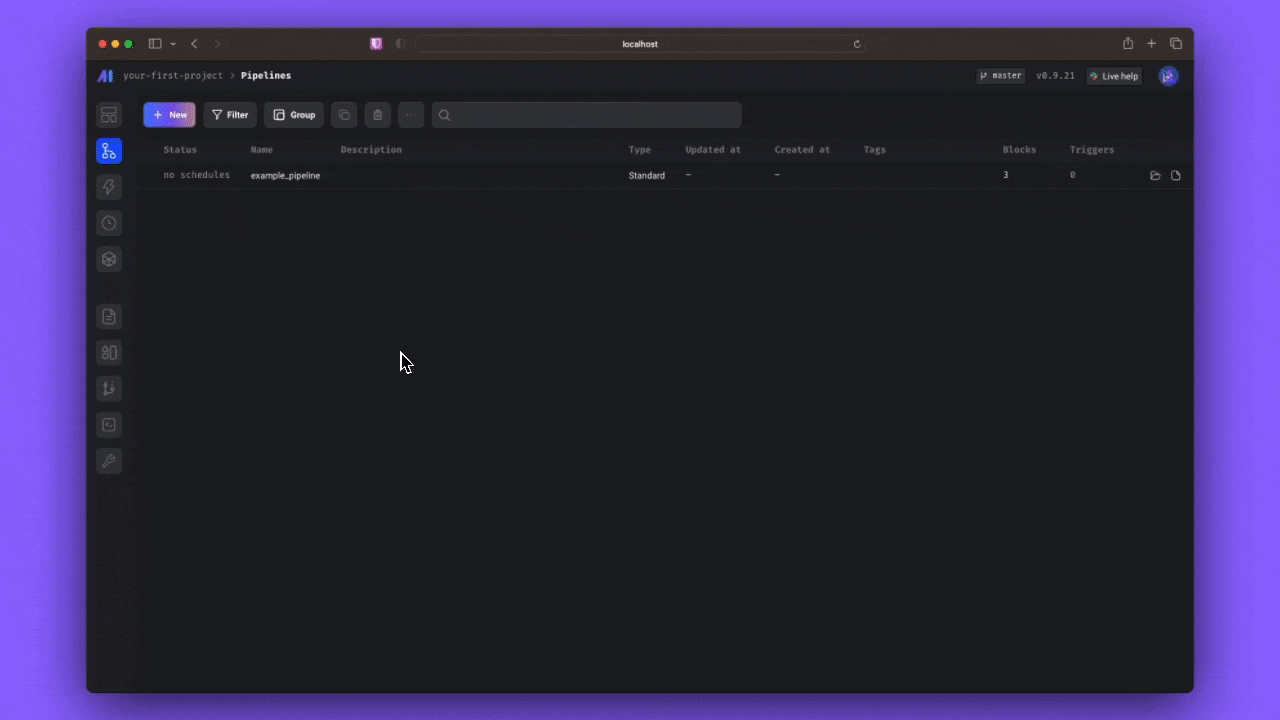
If you haven't already, open a browser to `http://localhost:6789`. From the pipelines page, select `example_pipeline` and open the notebook view by selecting `Edit pipeline` from the left side nav.
Select the first block by clicking it and select the "play" icon in the top right to run the block. You've just ran your first Mage block & loaded data from a dataset!
Do the same for the following cells in the pipeline to transform and export the data. Congrats, you're now a Mage ninja! 🥷
## 🧙🏻♂️ Install Mage dependencies (optional)
Mage also has the following add-on packages:
| Package | Install | Description |
| -------------------- | ------------------------------- | -------------------------------------------------- |
| all | `mage-ai[all]` | install all add-ons |
| azure | `mage-ai[azure]` | install Azure related packages |
| clickhouse | `mage-ai[clickhouse]` | use Clickhouse for data import or export |
| dbt | `mage-ai[dbt]` | install dbt packages |
| google-cloud-storage | `mage-ai[google-cloud-storage]` | use Google Cloud Storage for data import or export |
| hdf5 | `mage-ai[hdf5]` | process data in HDF5 file format |
| mysql | `mage-ai[mysql]` | use MySQL for data import or export |
| postgres | `mage-ai[postgres]` | use PostgreSQL for data import or export |
| redshift | `mage-ai[redshift]` | use Redshift for data import or export |
| s3 | `mage-ai[s3]` | use S3 for data import or export |
| snowflake | `mage-ai[snowflake]` | use Snowflake for data import or export |
| spark | `mage-ai[spark]` | use Spark (EMR) in your Mage pipeline |
| streaming | `mage-ai[streaming]` | use Streaming pipelines |
To install these, run the following command from the Mage terminal:
```bash theme={"system"}
pip install "mage-ai[spark]"
```
or add the following to your `requirements.txt` file:
```
mage-ai[spark]
```
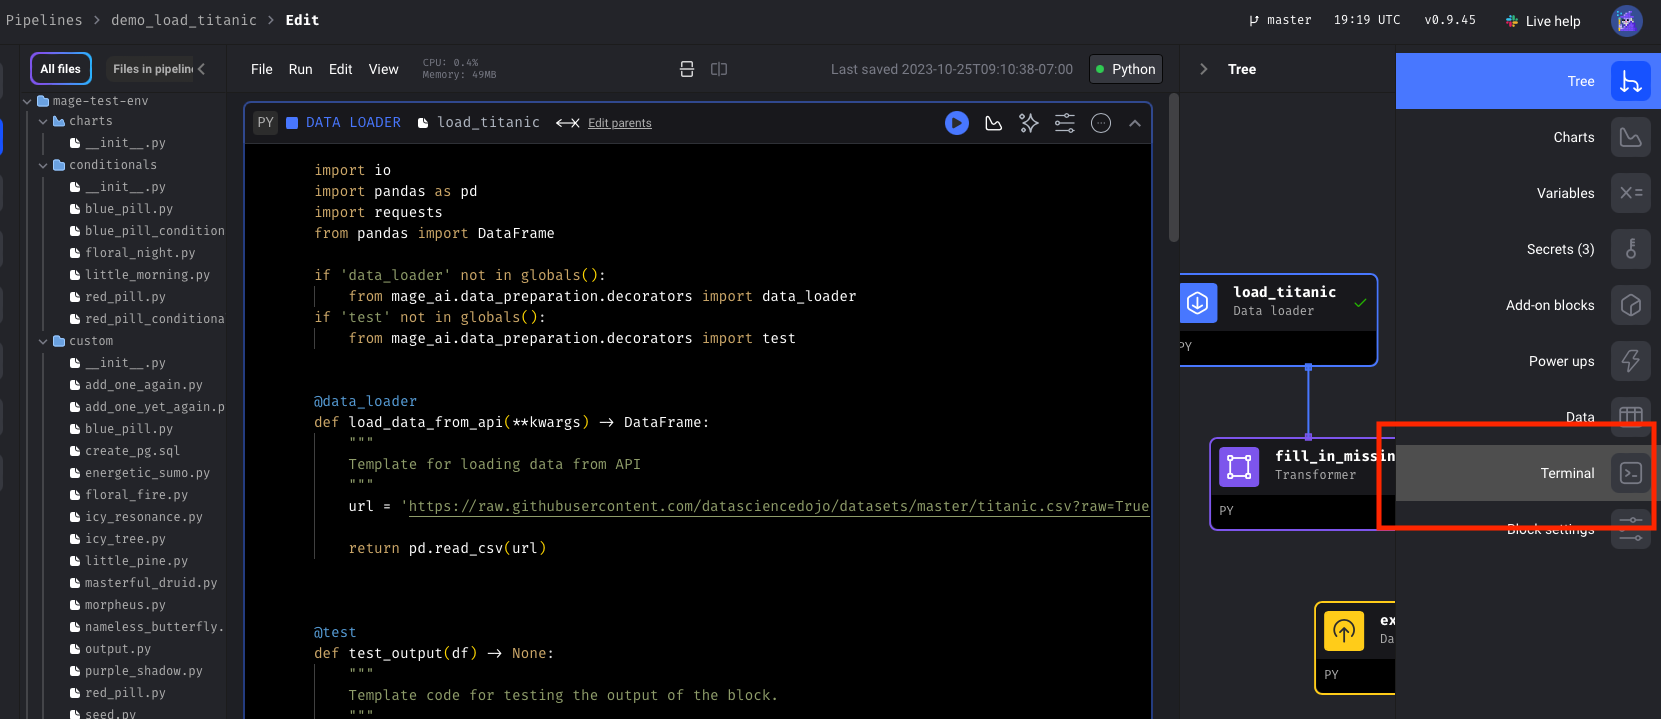
You can access the terminal from the side nav on the right in the pipeline editor page. Read more about installing from `requirements.txt` [here](/development/dependencies/requirements).
## 🧭 Journey on
Navigate to our [tutorials](/guides/overview) to learn more about Mage and how to build your own pipelines or continue exploring our docs for advanced configuration and deployment options.
If you're interested in connecting a database in Docker, check out our [guide](/guides/docker/connecting-a-database) for more information.
 ## 🧭 Journey on
Navigate to our [tutorials](/guides/overview) to learn more about Mage and how to build your own pipelines or continue exploring our docs for advanced configuration and deployment options.
If you're interested in connecting a database in Docker, check out our [guide](/guides/docker/connecting-a-database) for more information.
## 🧭 Journey on
Navigate to our [tutorials](/guides/overview) to learn more about Mage and how to build your own pipelines or continue exploring our docs for advanced configuration and deployment options.
If you're interested in connecting a database in Docker, check out our [guide](/guides/docker/connecting-a-database) for more information.